
What CrewBook is#
CrewBook is the day-to-day book your office and site teams work from. Each day has a list of jobs; each job has its crew, materials, plant and subcontractors. The same data drives wages, expenses, purchase invoices, the per-contract P&L and a live map of where tomorrow's work is — and the sales side (leads, quotes, contracts, invoicing and credit control) is built in as its own QCI area.
Everything is shared across every signed-in person in your company, live: when a colleague books a job or approves a claim, your screen catches up by itself. What each person can see is controlled by their access tier.
Creating your account and signing in#
Everyone gets their own personal login. Sign up with an email address and password (verified by a 6-digit emailed code), or in one step with Continue with Google, Microsoft, Facebook or Apple.
- Go to crewbook.me and click Start Free Trial — or, if you're joining your firm's existing CrewBook, use the sign-up link and the exact email address your invite was sent to.
- Enter your Email, Password and Confirm Password, and click Create account — or use one of the Continue with… buttons.
- Type the 6-digit code from the Verify your email screen and click Verify. No code? Click Resend and check spam.
Forgotten password? Click Forgot password? on the log-in page, enter your email, and follow the emailed link to set a new one. If you originally signed up with Google, Microsoft, Facebook or Apple, there's no CrewBook password to reset — use the same Continue with… button every time.
If something's not right#
"Invalid email or password" when logging in
Wrong credentials — or the account was created with a social provider rather than a password.
Check the address, try Forgot password?, or log in with the Continue with… button you originally signed up with.
"Invalid verification code" when signing up
The code was mistyped or has expired.
Re-enter it carefully, or click Resend and use the code from the newest email.
"Invalid reset link" when resetting a password
The link was cut short by email software, or has been used or expired.
Click Request a new link and use the newest reset email — copy the whole link into the address bar if clicking doesn't work.
"Access Restricted — you are not registered to use this application"
The login you're using isn't registered for the app.
Check you're signed in with the right account, try logging out and back in, or contact your administrator for access.
The cookie banner has gone and you want to change your answer
The banner only shows until you press one of its buttons; the answer is then stored in that browser.
Go to Account → Privacy Policy, find Cookies and Similar Technologies, and click Change your cookie choices. The banner comes back and your next press replaces the old answer. Clearing the site's stored data does the same thing.
Your company, the setup wizard and subscribing#
Every login belongs to exactly one company. The first person from your firm creates it — everyone else joins by an administrator's invite and should never create a company of their own (that gives them a separate, empty workspace). Creating the company starts the whole team's 14-day free trial, no card needed, and makes you the Owner with Super Admin access.
The setup wizard#
After creating the company, a six-step wizard configures it. Progress saves on every Next, so you can stop and come back — and you can re-run it any time from Admin → Re-run Setup.
- Company Details — company name (required), logo, contact details and address.
- Job Types — the pick-lists offered when creating jobs. It starts with Groundworks, Tarmac, Concrete, Drainage, Roofing and Fencing plus categories (Preparation, Main Works, Finishing, Remedial, Survey); add your own with Enter, remove with the ×. Editable later in Settings.
- SharePoint — optional: "CrewBook can file the sales documents it produces onto your site, and can keep your nightly backup there". Choose Yes, we use SharePoint / Microsoft 365 and enter your SharePoint site name (the word or two CrewBook matches to find your site), or No, we don't use SharePoint ("Keep documents and backups in CrewBook or on Google Drive instead"). You must pick one; you can change it later.
- Add Workers — your first team members (name and phone). The rest can be added later on the Workers page.
- Notifications — who gets emailed about what: holiday approvals and reminders, weekly wages, new suppliers, new clients, photo uploads. Leave a field blank to disable that notification.
- Optional Features — WhatsApp job briefs (needs a one-off setup from Admin → Integrations afterwards, about 20 minutes) and Daily Google Drive backups (nightly export of the whole database — works as soon as it's on).
You can Skip setup at any step and finish later in Settings — the app works either way.
The trial and subscribing#
When the 14-day trial ends (the last day is included), the app shows a subscribe screen to everyone until someone completes it: Subscribe now → secure checkout → "You're subscribed!". It's £99/month per company including VAT, unlimited users, cancel anytime — adding staff never raises the price.
If something's not right#
You were invited, but you see "Create your company"
The invite hasn't been sent yet, or went to a different email address — invites are matched by email.
Don't create a company. Ask your administrator to (re-)send the invite to the exact address you log in with, then log out and in again — you'll be attached automatically.
The setup wizard keeps reopening at every login
Setup was never finished or skipped.
Click through to Finish, or click Skip setup — both mark it complete.
"Run the setup wizard first to create your company settings…"
The company settings record doesn't exist yet, so the Lists & Options panel has nothing to save to.
Open Admin → Re-run Setup, complete (or skip) the wizard, then come back.
Everyone suddenly sees the subscribe screen
The trial expired, or the subscription was cancelled.
Have someone click Subscribe now and complete the checkout — the whole company's access is restored as soon as payment confirms. Stuck on "Confirming your payment…"? It re-checks every few seconds, and you can safely close the page — activation happens automatically.
Your team and who sees what#
Staff are invited from Admin → Users & Access: type their email, pick a tier, click Invite. If the address already has a CrewBook login it joins your company immediately; otherwise they're attached automatically the first time they sign up with that email.
| Access tier | What they see by default |
|---|---|
| Super Admin | Everything, always — page chips can't lock them out. The only tier with the Data Explorer. The company creator starts here. |
| Admin | Every page, including Admin Settings, Costings, Backup and QCI Sales; can manage existing users' tiers and permissions, though sending a new invite is the Owner's or a Super Admin's job. |
| Office Staff | Dashboard, Calendar, Day View, Credit, Invoices, Workers, Holidays, Mileage Log, Message Delivery, Guide and Account. |
| Site Staff | Dashboard, Calendar, Day View, Holidays, Mileage Log, Guide and Account — built for crews checking the day's work from a phone. |
Beyond the tier, each user's row has a Permissions expander with page chips — blue = visible, grey = hidden — so an Office Staff member can be granted Wages, or QCI Sales, as an exception. The Expenses button toggle lives there too (lets someone submit expenses from the Dashboard without seeing Petty Cash), while the linked worker dropdown sits on the user's row itself, next to the tier — it ties a login to its record on the Workers page. Every signed-in user always has their Account page — it can't be revoked.
Finding your way around#
The header holds the main pages — Dashboard, Calendar, Day View, Credit, Invoices — plus the Team dropdown (Workers, Holidays, Wages, Petty Cash, Mileage Log, Message Delivery). Sales lives in its own QCI area, entered via the QCI logo button. Admin (Settings, Backup) sits at the top right, along with your round initial button for Account and Logout. Costings is no longer one of them — it lives in the QCI area now. On a phone, less-used pages tuck behind More in the bottom bar.
- You only see the pages your tier or custom permissions grant — a missing menu item usually means a missing page chip, not a fault.
- The search box in the header jumps straight to any contract number, client or site.
- A Back button sits at the left end of the header on every page. It steps back one page exactly as the browser's own back button does, so following a search result or a job link and coming back is one click. It hides itself when there is nowhere to go back to — the first page of a session, or a link opened straight into the app.
- Like CrewQCI, the app installs from the browser: Account → Install App (on iPhone: Safari's Share → Add to Home Screen).
- The ? button in the header opens this guide at the chapter for the page you're on — and inside the QCI area it opens the CrewQCI guide instead, where the sales side is documented in full. The in-app Guide page is a condensed version, always to hand from the navigation.
How it behaves on a phone#
- Swipe back closes what's open. Swiping back (or the Android back button) while a dialog is open closes the dialog rather than leaving the page — so a half-filled job or claim is no longer lost by the gesture you'd naturally use to dismiss it.
- Dropdown lists rise from the bottom. Any list you pick from opens as a sheet pinned to the bottom of the screen, where the keyboard can't cover it, with the options spaced for a thumb.
- Pull down to refresh. From the top of any page, pull down to refetch everything on screen. It waits if something is still saving, so a refresh can never overwrite a save in progress.
- Registers remember where you were. A table's search text and column filters survive switching to another page and coming back.
- Small buttons are easier to hit. Icon buttons carry an invisible 44-pixel target, so the tap area is bigger than the icon looks.
Dashboard#
The Dashboard is the "what needs my attention right now" page — a grid of cards summarising today and tomorrow, with a click-through on almost everything. The ones worth a habit:
- Today's Jobs / Tomorrow's Jobs — each job with its worker, materials, hire and sub counts. Click a job to open it in Day View.
- Unnotified Tomorrow — workers on tomorrow's jobs who haven't had their WhatsApp brief yet. "All notified ✓" is the end-of-day goal.
- Unbooked Items — every material, hired plant item and subcontractor for this week and next that isn't ticked as booked: a forward-looking ordering checklist.
- Credit Check — upcoming jobs whose credit status still says "Needs Checking" or "No Credit".
- Not Yet Invoiced — jobs dated before the end of this week with no invoice issued (remedial jobs excluded), grouped by client.
- Worker Status (14 days), Provisional Jobs, My Claims (your own expenses) and Recent Site Photos — a month of uploads from site, with a full-screen viewer and Download all.
Every card header has an expand icon for the full list, and the top buttons open the Mileage Log and a quick Expenses claim form (shown to anyone whose Expenses button is enabled).
Calendar#
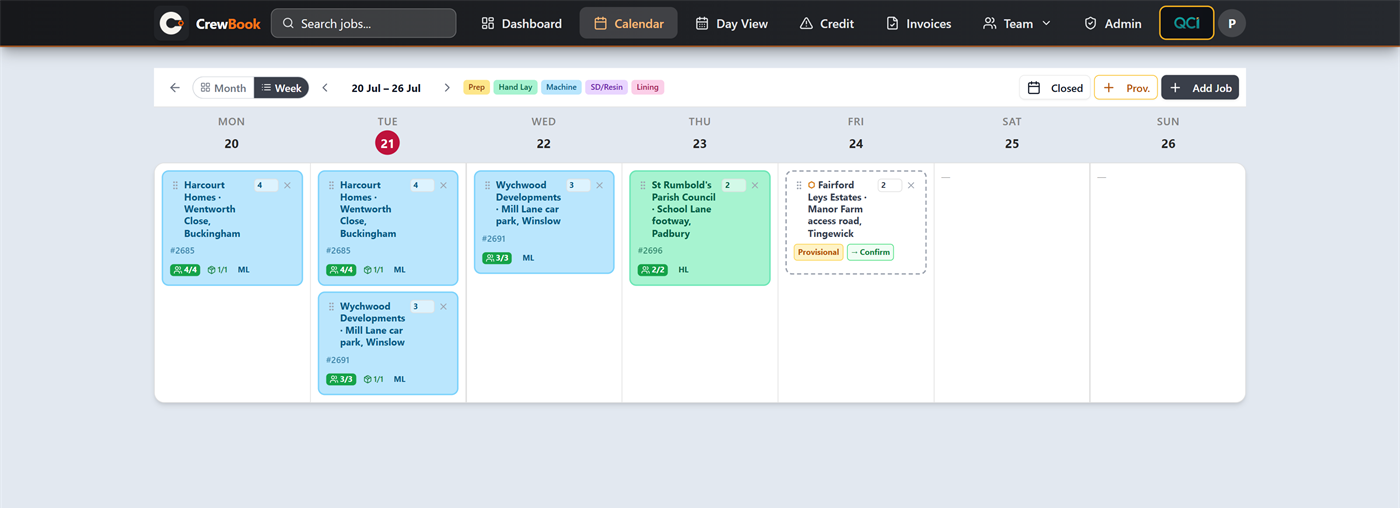
The Calendar is the central schedule — Month or Week view, one card per job per day. Cards carry the client and site, the contract number, the coordinator's initials, a worker-count badge ("3/4" — green when full, orange when short) and a materials badge (green once everything's booked). Card colours follow the job category — Prep amber, Hand Lay green, Machine blue, SD/Resin purple, Lining pink — and a red R chip marks remedial work. The green +N pill in a weekday's corner is spare capacity: your available workforce minus everyone off or already spoken for.
Adding a job#
- Click + Add Job and set the Job Date — or click Multi-day? and set start and end dates; the dialog confirms "This will create N working day jobs (weekends & holidays excluded)."
- Type into Select contract ("Search by contract #, client, or site…") — it searches your own contract register as you type, listing each match as its contract number with the client and site beneath. Picking one auto-fills the contract number, client, site, coordinator and contacts. Otherwise fill the fields by hand. This used to read from SharePoint, which meant no lookup at all unless you happened to keep a Contracts list there. It now reads the register you actually maintain, so it works for everyone.
- Add the Full Address (this is what puts the job on the Live Map and behind the Maps links), What3Words and contact details.
- Pick a Job Category and Job Co-Ordinator, set Desired Workers, tick Remedial Job if it's a return visit, and click Add Job.
Provisional bookings#
Work that isn't signed off yet is pencilled in with + Prov. — no contract number needed, just a client and/or site and the dates. Provisionals show as white dashed-border cards with a ⬡ badge. When the job is confirmed, click the green → Confirm button, look up (or type) the contract number, and resolve any differences the dialog flags between what was pencilled in and what the contract register says. Costs booked on a provisional follow it into Costings once it has its number.
The Full Address field has a Use client's address button beside it, which pulls the postal address straight off the client's account rather than making you re-key it. It fills in as one line, and you can edit it afterwards like any other address. It needs a client name in the dialog, and an address saved on that client's account.
Rescheduling, deleting and closed periods#
- Drag to reschedule — drag a card (on touch screens, from its ⣿ grip) onto the new day. Workers, materials, hires, subs and plant all move with it, and the toast has an undo.
- Delete — the small × on the card, with a confirm; the undo in the toast restores the job and everything attached.
- Closed periods — the Closed button manages bank holidays (set up automatically) and your own shutdowns. Closed days grey out, are skipped by multi-day bookings, and refuse dropped jobs. Booking a single job on a closed date warns but doesn't block.
If something's not right#
The contract search shows "No contracts found"
Nothing in your contract register matches what you typed. The lookup searches contract number, client and site, and only contracts that exist in the QCI contract register can be found.
Try fewer characters, or the client name instead of the number. If the contract genuinely isn't on the register yet, fill in the Contract No. and the other fields by hand and add the contract in QCI afterwards.
A job can't be dropped on a particular day
That day is inside a closed period.
Pick another day, or adjust the closure under Closed → Manage Closed Periods & Holidays.
"Failed to create job / move job / delete job — please try again."
The save didn't reach the server — usually a connection blip. Nothing half-happened; the screen reverts.
Check your connection and retry.
No green "+N" capacity number on a day
Capacity only shows on open weekdays with active workers set up, and only when there's a surplus to show.
Nothing is wrong — a missing badge means a weekend, a closed day, or no spare workers.
Day View#
Click any day and you're in Day View: every job on the date, each with its workers, materials, plant, subcontractors and hires shown as chips you can tick, drag and click. This is where the day actually gets run.
Assigning workers#
- The Unassigned Workers pool at the top holds everyone available today who isn't on a job yet.
- Drag a name onto a job — or click several names to select them, then click + Add N on the target job. Drag chips between jobs to move people.
- Click a worker's name on their chip to set their shift (0, ⅓, ½, 1, 1½, 2), their job order for the day, and the Driver tick. Shifts drive wages — and a worker on two jobs in one day is split ½ and ½ automatically.
Chip colours carry live information: blue = WhatsApp brief sent, green = brief read, amber = the worker has a day status (sick, holiday…) and probably shouldn't be on the job.
Booking materials, plant and subs#
Every material, hired plant item, subcontractor and other cost has a circle icon — click it once the order is actually placed and the chip turns yellow with a tick. These ticks drive the Dashboard's Unbooked Items card, which counts the materials, hired plant and subcontractors among them. A Split Load Charge is the one exception: it sits under the material it belongs to and its circle mirrors that material's — tick either one and both are booked. Booking a material opens inline boxes for the order reference and delivered quantities on every material, whoever the supplier is, so tonnages can be trued up after the day. An amber ⚠ triangle on a chip means it carries a note — tap to read it.
When you type a supplier name that isn't on file, CrewBook checks for near-misses first — typos, part-names and spacing differences, so "FM Conway" finds "F M Conway Ltd". Any it finds are listed under Similar suppliers already exist — is it one of these?, and the add button reads None of these — add "…" as new so you have to mean it. While that list is showing, pressing Enter won't create the supplier. The client name on a job does the same, offering a Did you mean: row of existing accounts before it raises a new-client request.
Each job card also carries its credit status badge (click to change — Needs Checking, OK, No Credit, Percentage Upfront, Special Authority) and its invoice status badge (Not Invoiced red, Draft Raised blue, Invoiced green, Proforma amber) — click it to set the status and which job days it applies to. Both feed the Dashboard's checklists.
If something's not right#
A worker isn't in the Unassigned Workers pool
They're already on a job today, they have a day status (holiday, sick…), they're marked monthly-paid — or, on a weekend, they haven't been marked available.
Check the Worker Day Status card and, at weekends, the Weekend Availability panel; remove the status or mark them available.
A plant chip has gone red with "⚠ 3/2"
More of that plant item is assigned across today's jobs than the company owns.
It's a warning, not a block — take the plant off one of the jobs, or arrange a hire.
"Failed to save — please try again."
A change didn't reach the server; the screen reverts to the previous value so nothing is half-saved.
Retry once you're connected.
"[Worker] is already on this job"
The name was dragged or tapped onto the same job twice — CrewBook refuses the second one rather than showing the worker on the job twice.
Nothing to fix; the worker is already there. To move them elsewhere, drag their existing chip to the other job.
Ticking a Split Load charge ticks its material too
The charge has no booked state of its own: its circle shows the material's, and clicking either toggles both.
That's deliberate — the charge belongs to the material it sits under, which is also why it's kept out of the loose daywork and haulage chips. Two chips turn yellow, but the Unbooked Items card only ever counted the material.
The job editor#
Click Job Edit on any job card to open the full editor — a large window with tabs across the top, each with a count bubble: Summary, Job Setup, Workers, Own Plant, Materials, Hired Plant, Subcontractors, Other Costs and Media.
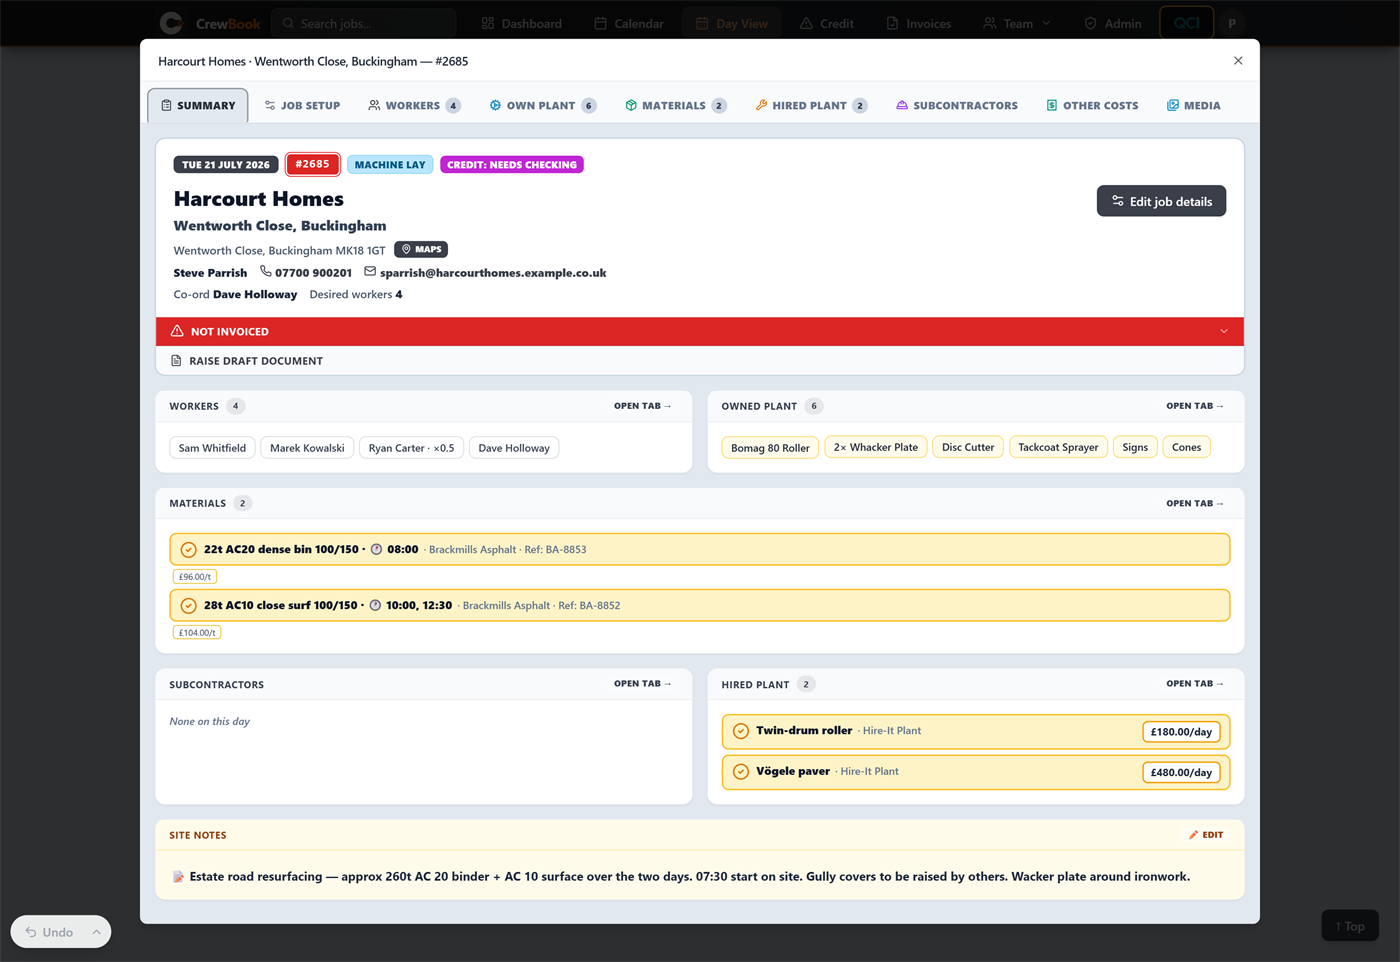
- Summary — the job at a glance: badges, invoice status bar, the Raise draft document button (see the QCI area), cards for each section with Open tab → shortcuts, and the editable amber Site Notes card — those notes show on the Day Overview and go out in the WhatsApp brief.
- Job Setup — click any row to edit the client, contract number, site, coordinator, address, What3Words and contacts. Changing the contract number offers to apply it to the site's other days and stamp it onto linked costs; editing the site or client on a numbered contract syncs across its other days automatically. Job actions live here too: WhatsApp gang, Move day (everything moves with it), Add another day (same details, fresh costs), and the danger zone — Cancel job… with a reason (stays on the calendar, struck through, reinstatable) or a two-step permanent delete.
- Workers — the gang with shifts, driver ticks, and subsistence/hotel allowances per worker.
- Own Plant — tick the company plant on site (Big Plant, Smaller Plant, Incidentals & Tools). Picking a paver adds its usual rollers and opens the haulage form — movement, quoted cost (auto-filled), from/to, and an invoice check. Changes here only save when you click Save plant.
- Materials — orders with supplier, quantity, unit and price; From Yard for own stock; Split Load for two materials on one wagon — its charge line is added automatically, stays tied to that material and follows the material's booked tick rather than a separate one you tick yourself. Where a day has more than one split load, each charge is matched to its own material by order reference first and then by supplier, so editing one load's supplier or order reference updates the right charge instead of the first one found; delivery times with an auto-fill for multi-load tonnage runs; daywork charges; and a per-item invoice check — enter the invoiced figures and the icons tell you green = matches, amber = under, red = over. Contra Charge records a credit note due from the supplier.
- Hired Plant / Subcontractors — rates, ordered prices and invoice checks. Setting a hire's from/to dates puts it on every job day it spans; Invoice logged elsewhere and Apply invoice to another day? stop a multi-day invoice being counted twice. Ticking CIS Deductible on a sub shows the 20%-of-labour deduction live.
- Other Costs — grab lorries, testing, traffic management, drawings, with the same booking and invoice checks.
- Media — photos, videos, sign-off sheets and documents uploaded from site; notes, category badges, automatic compression, and one summary email per batch to the office. Uploads surface on the Dashboard for a month. See notes on site photos below.
Notes on site photos#
The Notes (optional) box at the top of the Media tab records what was done on site. There are two ways to use it, and they behave differently:
- Type the note before uploading, then upload as normal. The text is saved onto every file in that batch, shows under each thumbnail, and is included in the upload email. The box keeps what you typed, so the same note carries to the next batch until you change it.
- Type the note and press Save notes. The note is saved on its own and appears in the Saved notes list underneath, stamped with the date and who wrote it. The box clears, and the office gets a short follow-up email. Use this for anything you think of after the photos have gone up.
Every note in Saved notes can be removed — hover the note and click the bin icon. Removing a note leaves the photos untouched.
If something's not right#
Plant changes disappeared
The Own Plant tab only saves when Save plant is clicked.
Re-select the plant and click Save plant before leaving the tab.
"Updated this day, but N other day(s) on contract #X didn't sync."
A shared detail saved on this day but failed to copy to some of the contract's other days.
Refresh the page and make the same edit again — only the failed days need the retry.
Rows in Job details won't open for editing
The job is cancelled — cancelled jobs are read-only.
Click Reinstate job first if the details need changing.
The editor closed by itself
A teammate moved the job to another date, or deleted it, while you had it open.
Find the job on its new date via the Calendar and reopen it.
Files uploaded from site but no email reached the office
No photo-upload recipients are configured.
An admin adds recipient addresses in Settings. The files themselves are already safely on the job — the email is only a notification.
A note I typed isn't in the Saved notes list
A note typed and then uploaded is saved onto the files themselves, not as a note in its own right — the two are recorded separately.
Look under the thumbnails: the text is there on each file from that batch. To have it in Saved notes as well, type it again and press Save notes.
Saved a note but the office didn't get an email
The follow-up email goes to the same recipients as the photo-upload email, and none are configured.
An admin adds recipient addresses in Settings. The note itself is saved either way — it's showing in Saved notes.
WhatsApp job briefs#
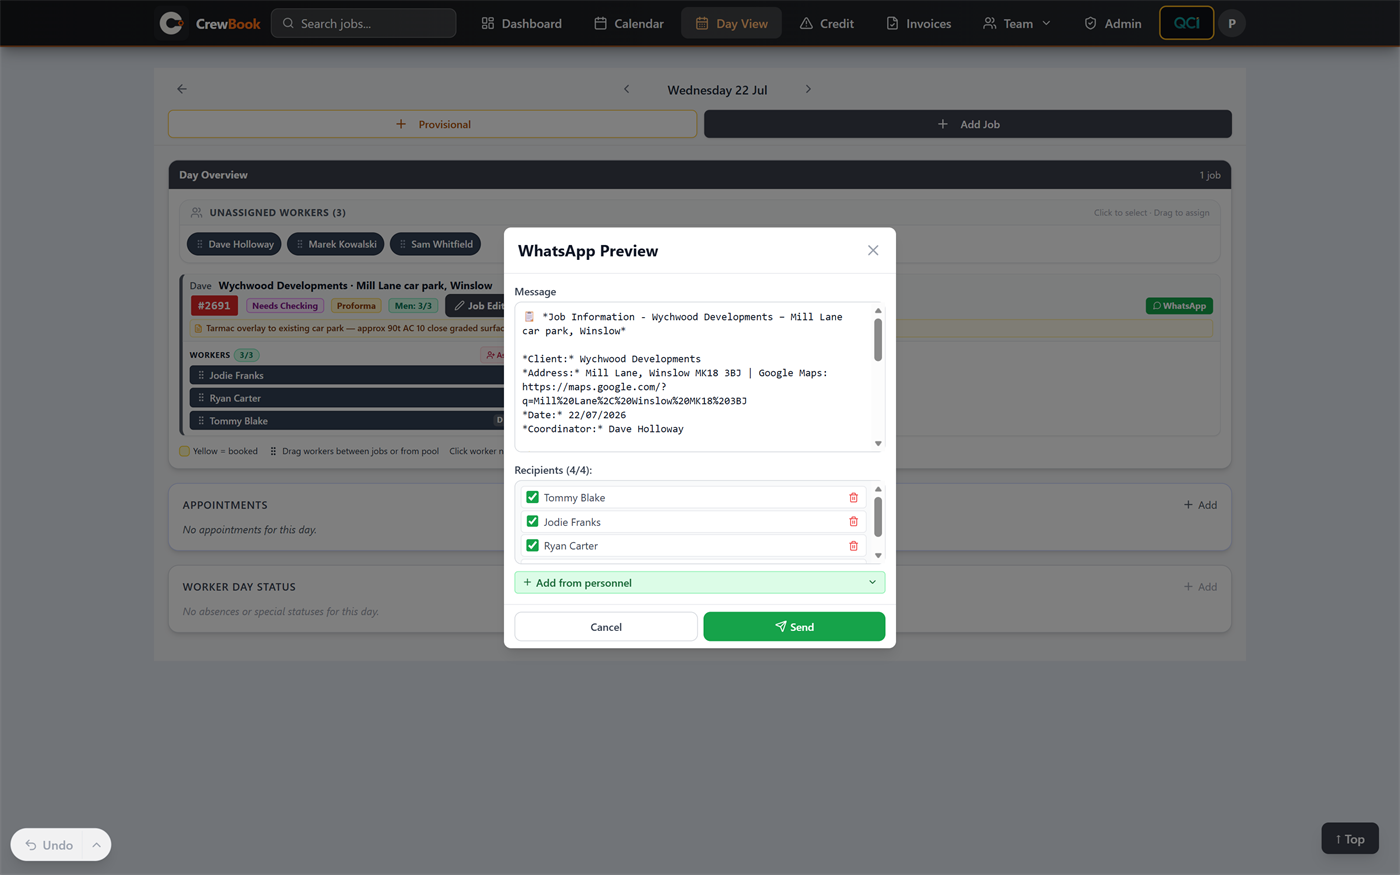
The brief sends each worker their day on WhatsApp: site, client, address with Maps and What3Words links, the crew list, plant, materials and notes. Messages go from your company's own WhatsApp number (see integrations), and delivery feeds back into the app — a worker's chip turns blue when the message arrives and green once it's read.
Hired plant and subcontractors booked as a date range are listed on every day of that range, not only the day the booking starts — so the middle of a week-long hire reads correctly. Tools and plant fall back to what is booked on the job itself when no plant record has been saved for that day, so the brief matches the job card rather than saying "N/A".
- Get the job right first — workers, materials, notes — because the message is built from what's currently recorded.
- Click the green WhatsApp button on the job card (or WhatsApp gang on the Job Setup tab).
- Check the recipients — every assigned worker plus the coordinator, pre-ticked. Untick anyone, or Add from personnel. The message itself is the approved template and can't be edited per send.
- Click Send and look for "WhatsApp sent to N recipient(s)".
If something's not right#
"Failed to send to: …" for some workers
Those individual messages didn't go through — a bad or missing number, or WhatsApp rejected them. The rest were sent.
Check the worker's phone number on the Workers page, then reopen the preview and send to just the failed people.
"No phone numbers found"
None of the assigned workers (or the coordinator) has a phone number recorded.
Add numbers on the Workers page — messages can only go to your own personnel, never to arbitrary numbers.
No WhatsApp buttons anywhere
WhatsApp is switched off for your team, or hasn't been set up yet.
An admin enables it and completes the one-off Twilio setup under Admin → Integrations — see integrations.
The preview shows an error with a Retry link
The preview couldn't be generated — a connection or sign-in blip, common on iPhones.
Click Retry; the app also retries by itself a few times.
Appointments, absences and weekends#
Two panels live on the Day View page itself, under the jobs.
Appointments#
Non-job visits — quotes, measure-ups, meetings — grouped by the person attending. Click Add, fill in the Site / Location (required), pick the time type — Start Off Job (visits on the way to the job, ordered #1/#2/#3), AM, PM, a specific time, or any time — and choose the attendees. Drag the ⣿ handle to reorder someone's list, and click the green WhatsApp circle by their name to send them their whole day's appointments in one message.
Worker day statuses and weekend availability#
The Worker Day Status card records who's off (or in the yard): Holiday, Sick, Compassionate Leave, Training, No Pay or Yard — one status per worker per day. A status takes the worker out of the assignment pool and turns their chip amber if they're accidentally still on a job; all of them except Yard also reduce the calendar's capacity number. On Saturdays and Sundays, the amber Weekend Availability panel appears instead: click each worker who's put themselves forward, and only they join that day's worker pool.
Live job map#
The Live Map plots every upcoming job with an address (next 90 days) on a UK map, one pin colour per coordinator. The legend buttons double as filters — click a name to hide or show their pins — and clicking a pin shows the job summary with an Open Day View → button. It's an admin-tier page by default; the address lookup runs one job per second, so a busy diary shows "Geocoding…" for a short while when the page opens.
A job is missing from the map
It has nothing in its Full Address field, its address couldn't be found (too vague or misspelt), it's cancelled, or its coordinator is filtered off in the legend.
Check the legend filters first, then tidy the address on the job — town and postcode help the lookup a lot.
Workers#
The Workers page (Team → Workers) is your crew roster. Each worker's card holds their contact details, start date, daily rates, and the role flags the rest of the app runs on.
- Click Add Worker and fill in the Full name — the only required field — plus phone, email and Start Date.
- Tick the flags that apply — each one changes how the app treats the person (table below).
- Click Save Worker. To set pay, open the pencil icon on their card and enter Basic Rate (£/day) and Charge Rate (£/day) — these drive the Wages page and export. Anyone who can open the Workers page can see them here; it's the Wages page's rate columns and the money values in the wage download that are admin-only.
| Flag | What it does |
|---|---|
| Job coordinator | Purple badge; appears in coordinator dropdowns and receives job briefs. |
| Foreman | Amber badge; listed at the top of worker lists when planning. |
| Driver (default) | Blue badge; treated as the driver by default when assigned to jobs. |
| Monthly paid | Salaried — excluded from the weekly Wages page and the Day View worker pool. |
| Casual | Orange badge; excluded from the capacity pool count. |
| Active on workforce | Untick when someone leaves — they grey out, drop out of planning, holidays and closure pay, and can be re-activated any time. |
Holidays#
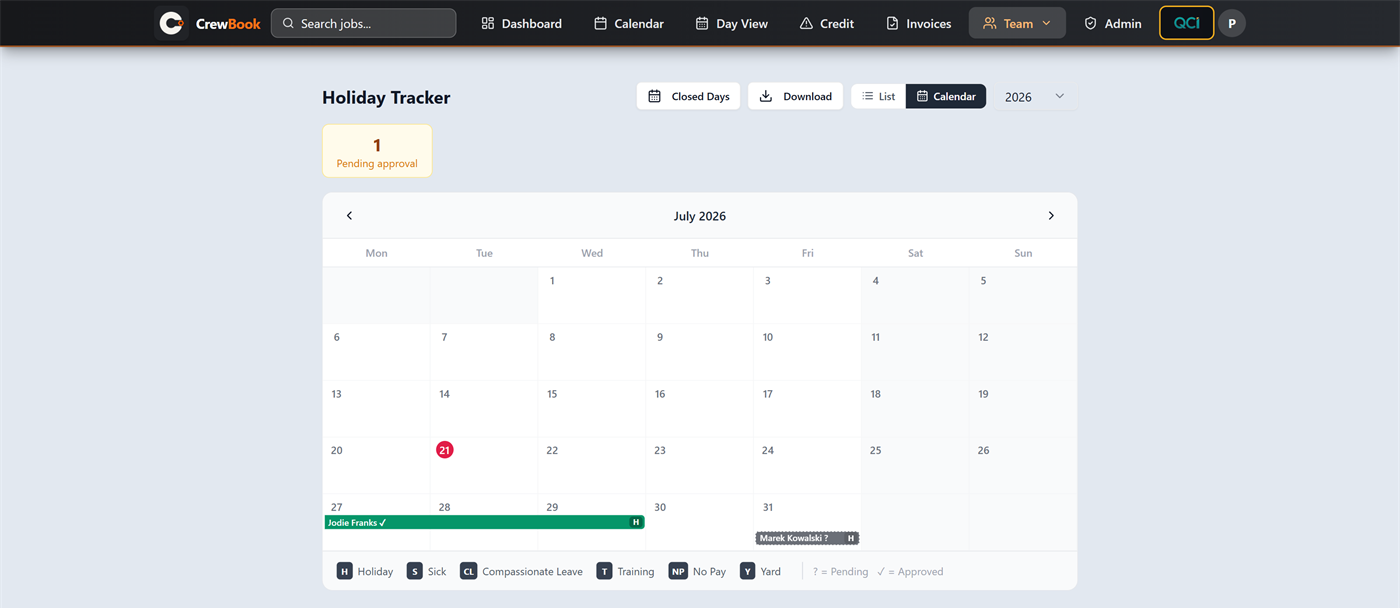
The Holiday Tracker (Team → Holidays) records every worker's holiday, sickness and other absence days against their annual entitlement, with a per-worker List view and a colour-coded month Calendar — each worker their own bar, pending days faded with a dashed outline, closed days shaded.
Recording and approving days#
- In List view, click the worker's row to expand it.
- Pick a date — or tick Date range for a from/to run; weekend days are skipped automatically, so a Monday-to-Friday week books exactly 5 days.
- Choose the status — Holiday, Sick, Compassionate Leave, Training or No Pay — and tick Pending Approval for a holiday that still needs sign-off.
- Click Add. Pending days show an amber clock badge; whoever approves clicks the green Approve button and a confirmation email goes to the configured approver address.
Each row's chips keep score: "12 / 25 hol" against the entitlement (edited inline in the expanded row), "N left" in amber when fewer than 3 days remain, "N over" in red, plus sick and pending counts. A daily "Holiday Approvals Needed" email lists everything still waiting — sent only when something actually is.
Closed days#
The Closed Days button manages company-wide closures. The standard England-and-Wales bank holidays are created for you the first time; add your own shutdowns (name, start, end) under Add Custom Closure. Closed weekdays shade the calendars, are skipped by multi-day bookings (a single job on a closed date gets a warning rather than a block), and are paid automatically for every active worker with nothing else booked. Download exports the year's records as a CSV.
If something's not right#
Approvals work but nobody receives the emails
The Holiday approver / Holiday reminder recipient addresses aren't configured. The approvals themselves are still recorded.
An admin sets both in the setup wizard's Notifications step (Admin → Re-run Setup).
The Add button is greyed out
No start date has been picked yet, or a save is still in progress.
Pick a date first, then click Add.
Wages#
The Wage Summary (Team → Wages, admin-tier by default) builds each Monday-to-Sunday week automatically from job labour, absences, appointments and closed days — there's no double entry. Each day cell shows a badge per shift (contract numbers for job work, status labels otherwise), the Shifts count, and Total × — the sum of multipliers payroll actually pays.
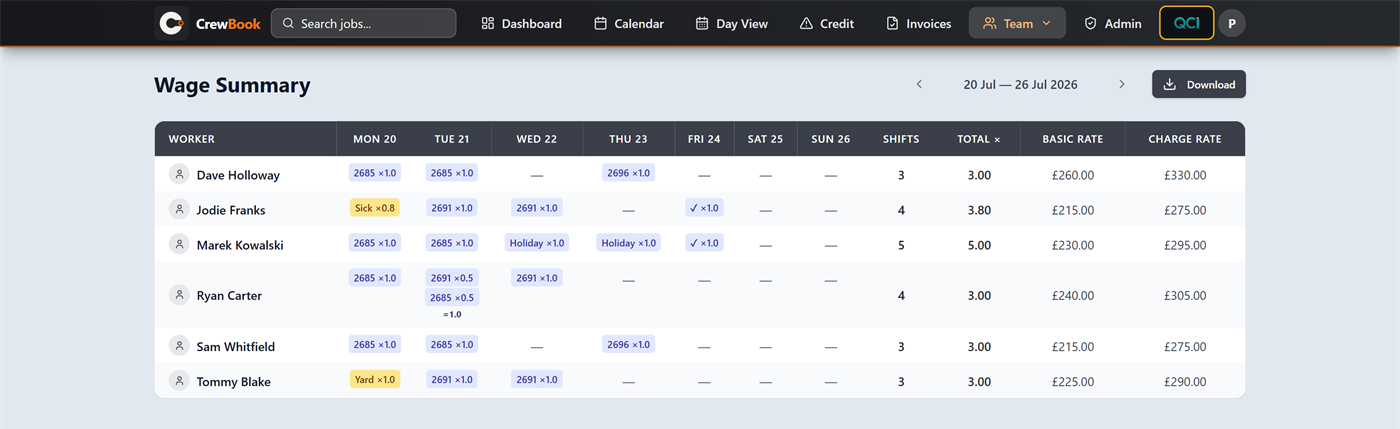
- Normal shifts, holidays, compassionate leave, training, yard days, appointments, bank holidays and closures pay ×1; sick pays ×0.8; No Pay shows on the grid but adds nothing.
- A worker on two jobs in one day shows both badges with the day total underneath — the split (½ + ½) was set automatically when they were assigned.
- Closed weekdays are paid for every active worker automatically — as Bank Hol when the date matches the official gov.uk England-and-Wales list, otherwise as Holiday. Workers who started after the closure date are skipped.
- Download saves the payroll spreadsheet (wages_date.xlsx) in the batch-timesheet format, with absences coded so payroll can post them. Rate figures fill in only for admins. The same file is emailed automatically each week to the configured Weekly wages recipients — the link in that email lasts 7 days.
If something's not right#
A worker is missing from the wage grid
They're flagged Monthly paid (exclude from wages), or they had nothing recorded that week.
Check their flags on Team → Workers and their entries on the Day View.
A bank holiday shows as "Holiday" — or isn't paid at all
A date is only paid when it's in the Closed Days list; it only shows as "Bank Hol" when it also matches the official gov.uk list.
Open Holidays → Closed Days and add or correct the closure dates.
Rate columns are missing, or blank in the download
Basic and charge rates are admin-only — everyone else gets the same sheet with the money columns blank.
Ask an admin to run the download if payroll needs the rates filled — and check the rates are set on the Workers page, or even an admin's sheet shows £0.
The link in an old wages email doesn't work
Emailed download links expire after 7 days.
Open Team → Wages, navigate to that week with the arrows, and click Download.
Absence & Cost report#
Who has been off sick or on holiday, how many times, the dates, and what it cost. The report reads the same day statuses you set on the Calendar and Day View and prices them from each worker's basic daily rate, so nothing has to be entered twice.
Find it under QCI → Reports → People, alongside the sales reports. It is admin-level: Sales and Viewer tiers do not see it.
Choosing what you're looking at#
| Filter | What it does |
|---|---|
| Reason | Sick (the default), Holiday, Compassionate leave, Training, Unpaid leave, Yard, or All reasons. |
| Basis | Costings (incl. NI) — the default — or Wages paid (excl. NI). See below. |
| View | Per person (the default): one row per worker per reason, with times off, days, cost per time and the dates. Per occasion: one row per spell, with its start and end. Per day: one row per day off, showing the rate and the multiplier applied. |
| Period | The usual period picker — it defaults to Financial year to date. |
"Times off" counts occasions, not days#
Being off Monday to Wednesday is once, not three times. Consecutive days of the same reason roll into one occasion, and a weekend between two absent days does not break the run — off Friday and Monday is one spell of sickness, which is how anyone would describe it. Any other gap starts a new occasion. This is what makes the report usable for return-to-work conversations: three separate one-day absences read very differently from one three-day one.
The two bases, and why the figure changes#
A day off costs the worker's basic daily rate times the multiplier your wages run pays for that reason — sick days at your Sick pay multiplier, unpaid leave at nothing, everything else in full. Wages paid (excl. NI) shows exactly that.
Costings (incl. NI), the default, additionally applies your employer NI loading, because that is how costings and the monthly management accounts value labour. It is the higher figure, and it is the one that agrees with your accounts. Whichever basis is used is printed on screen and on every export, so a figure never travels without its basis.
The rule that is easy to miss#
A day marked absent that also has labour recorded against a job costs £0 here — the wages run pays the job, not the absence. Someone marked sick who then turned up and was booked on site is paid for the work. Those days are still listed, because they remain a record of the absence, and the warnings total them separately. Without that rule the report would overstate what absence costs you.
Two other things worth knowing: a spell spanning a month end is split between the two months, exactly as wages are; and holiday days still awaiting approval are included.
If something's not right#
Days are listed but cost £0
Either the worker was booked on a job that day — so the wages run pays the job, not the absence — or the reason is Unpaid leave, or there is no basic rate on the worker's record.
The Note column says which it is. If it reads "No basic rate on worker record", set the rate under Team → Workers and the figures fill in.
The total doesn't match the management accounts
The report is probably on the wages basis, which excludes employer NI.
Set Basis to Costings (incl. NI) — the default — and check your employer NI loading in Settings matches the one your accounts use.
"No records for this period."
The Reason filter defaults to Sick, so a period with no sickness looks empty even when there was holiday.
Switch Reason to All reasons, or widen the period.
Petty cash and expenses#
Anyone with the Expenses button submits a claim from the Dashboard — description, amount, receipt photos, an optional contract number — and it lands as Pending under their name. Admins manage the full register on the Petty Cash & Expenses page: approve or reject, record the payment, and export the monthly summary. Claims flow through four statuses: Pending (amber) → Approved (green) → Paid (blue), or Rejected (red); claimants can watch their own progress on the Dashboard's My Claims card.
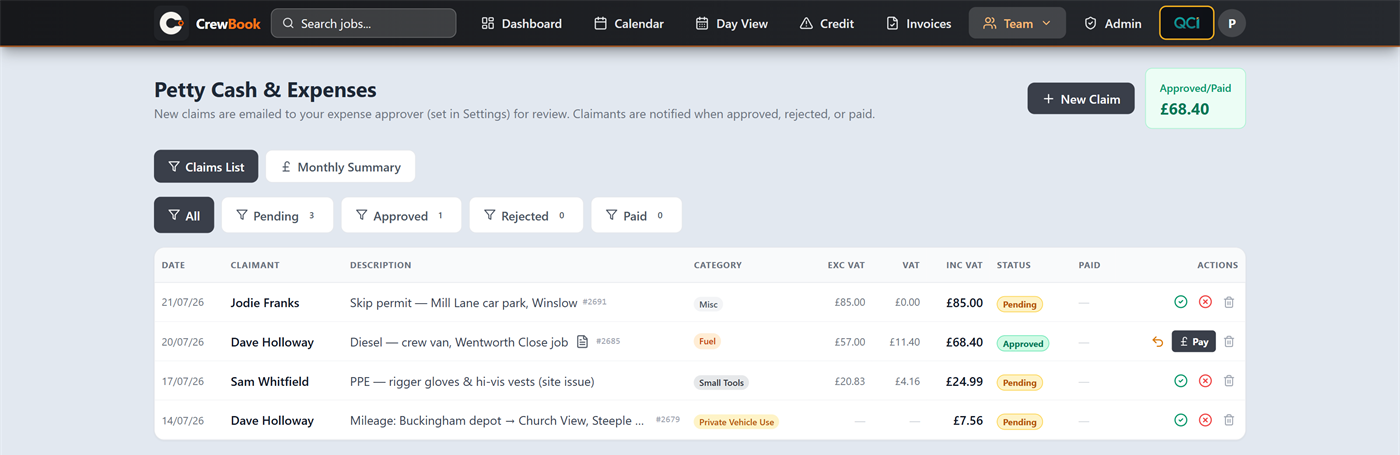
- Submit — from the Dashboard's Expenses button (any user) or New Claim on the Petty Cash page (admins). Add a receipt per item — camera photo or file — each with its own category, so one claim can carry a whole handful of receipts.
- Amounts — type the Exc VAT or Inc VAT figure and the rest fills in at 20% (adjusting the VAT box just updates the total); all three stay editable for zero-rated items.
- Approve — the approver gets an email per new claim; on the row, the green tick approves, the red cross rejects (and an undo arrow moves an accidental approval back).
- Pay — the blue Pay button opens the payment window, where you record who was paid, how (bank transfer, cash, cheque) and when. It lists every approved claim for that claimant, so you can settle the one you clicked with Pay this claim or clear the lot with Pay all — the paid-to, method and date you enter apply to whichever you choose.The Pay all button only appears when the claimant has more than one approved claim waiting.
- Month end — the Monthly Summary tab totals the month's approved and paid claims by category, with a styled Export Excel download.
"Admin Only" screen instead of the Petty Cash page
The full register is restricted to administrators.
Submit and track your own claims from the Dashboard instead — the Expenses button and My Claims card are there for exactly this.
No approval emails are going out
No Expense approver email is configured.
An admin sets it in Settings — and optionally an Expense payer email for payment notifications (blank means the approver gets those too).
"No petty cash claims to export for this month"
The month has no Approved or Paid claims — Pending and Rejected are excluded from the summary.
Approve the claims first, or pick a different month.
Mileage log#
Workers log business journeys and turn them into expense claims. Everyone logs their own; admins see and log for anyone. What a journey is worth depends on the vehicle on the worker's record. A personal car is paid 55p a mile for the first 10,000 business miles in the tax year and 25p a mile above that. A company car is paid the quarterly HMRC Advisory Fuel Rate matching its fuel type and engine size, with no 10,000-mile band at all. See the 10,000-mile band below.
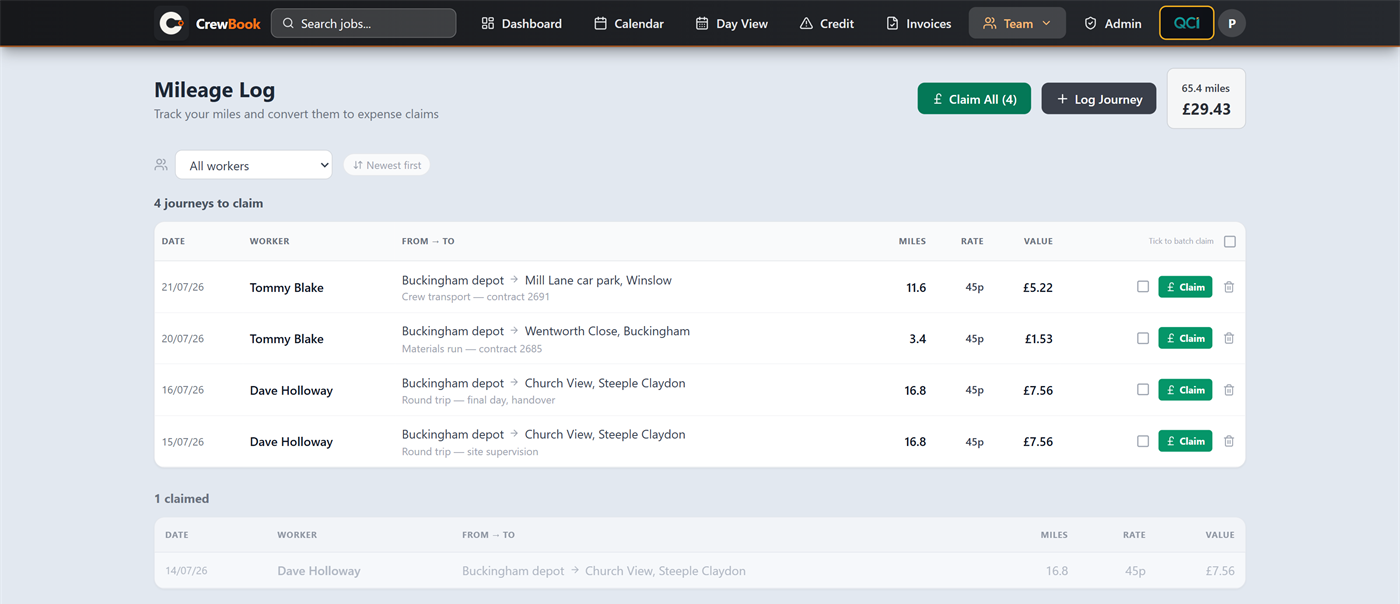
- Click Log Journey. Capture the route with Locate at each end (GPS, with road-distance lookup), type both addresses and use Calculate Road Distance from Addresses, or just type the miles.
- A journey can have as many stops as it really had. The form starts with From and To; Add another stop adds a leg, each one labelled Then, and the × on a row (Remove this stop) takes one out again. The last row is always the final destination. The whole route then travels with the journey, joined by arrows — "Yard → Site A → Site B → Yard" — in the From → To column and on the expense claim it becomes, so a day spent hopping between sites reads as one journey instead of four.
- Tick Return journey for there-and-back (miles are doubled) and fill in the Purpose. The form auto-saves as a draft while you type, so closing it mid-trip loses nothing.
- Check the Claim Rate. An Extra p/mile can be added where agreed — an amber Evidence required for higher rate panel then asks for a photo (the journey still saves without one, so take it). Underneath, the form shows what the journey will come to: Total: £84.70 (55p × 154 miles). If the journey would take the claimant past 10,000 business miles for the year, that estimate turns amber instead, gives the rate breakdown and adds a second line — Joe Bloggs already has 9,900 business miles in 2026/27. Miles past 10,000 are paid at 25p (HMRC approved rate).
- Click Log Journey, then later Claim on the row — or tick several and use Claim Selected (3), or Claim All (12), for one batch claim. Either way a Pending expense claim is created in the Private Vehicle Use category, and the journeys move to "claimed". Deleting that claim later puts the journeys back, so no miles are ever lost.
The 10,000-mile band#
A personal car is paid 55p a mile for the first 10,000 business miles a claimant drives in a tax year, and 25p a mile for every mile after that. Both figures are per person and per tax year, and the tax year runs 6 April to 5 April — a journey dated 6 April starts the new year's allowance whatever time of day it was logged. Company cars are on advisory fuel rates and have no band: their journeys are valued exactly as they are stored and are never split.
Only claimed and logged journeys count towards the 10,000. Drafts are left out of every total, and a draft's Rate column is simply its own rate — drafts never show a split. A split rate is worked out live for the journeys-to-claim list only; a claimed row below shows whatever rate is stored on the journey itself, and the claim's own description and notes are the full record either way.
Above the journey list sits a tax-year card per claimant: one for the worker you have selected, for this tax year, plus one for every worker and tax year that still has a journey waiting to be claimed. Set the filter to All workers and the card for today drops off, leaving only the ones with miles outstanding. Each card reads:
- The heading, top left — Joe Bloggs · business miles, tax year 2026/27 (6 Apr 2026 – 5 Apr 2027).
- The running total, top right — 9,950.5 of 10,000 at 55p, counting miles already claimed plus miles still to claim.
- A bar 10,000 miles wide: solid blue for miles claimed, paler blue alongside for miles still to claim. Under it, Claimed 8,200 · to claim 1,750.5 · 49.5 left at 55p — or, once the two together pass the line, Claimed 9,000 · to claim 1,240.5 · 240.5 past 10,000 with the last part in amber.
Past that, the card spells the position out. When the miles already claimed have passed the line it warns Past 10,000 claimed miles: every further mile in 2026/27 is paid at 25p (HMRC approved rate). When the claimed miles are still under but the journeys waiting to be claimed would cross it, the warning reads The journeys to claim cross 10,000 miles: 240.5 mi at 25p instead of 55p, £72.15 less. Rows past the line are marked below; values assume they are claimed in date order.
A worker on a company car gets no card at all — just a plain grey line reading Joe Bloggs · company car — paid advisory fuel rates, no 10,000-mile band.
Journeys that cross the line#
A journey with miles on both sides of 10,000 is tinted amber in the journeys-to-claim list, on desktop and on a phone alike, and its Rate cell shows both halves instead of one rate — 100 mi @ 55p + 100 mi @ 25p, with Past 10,000 business miles in 2026/27 on hover. On a phone the same row reads 100 mi @ 55p + 100 mi @ 25p (past 10,000). A journey wholly past the line shows the 25p half only; one wholly under it shows a single rate as it always did. The tint and the two-part rate belong to that list alone — once a journey is claimed it drops to the claimed list, which is never tinted and shows the rate stored on the journey.
Where a journey carries its own agreed Extra p/mile it shows as +5p beside the rate, and that extra is added on top of both bands — so a mile past 10,000 on a journey with 5p extra is paid 30p, not 25p.
What a claim shows before you commit#
Ticking several journeys and claiming them opens Review Batch Claim, with the number of journeys underneath the title. Each journey is listed, and any that meets the line is annotated in amber: Crosses 10,000 business miles for 2026/27 partway through this journey, or Already past 10,000 business miles for 2026/27 when there are no full-rate miles left for it at all.
Below the list is the before-and-after panel, one box per tax year the claim touches. Its first line is Joe Bloggs · tax year 2026/27: 8,200 → 9,950.5 business miles claimed — what the claimant had claimed in that year, and what they will have claimed once you confirm. The second line is the part worth reading:
| The box is | and the second line reads |
|---|---|
| Blue | 49.5 miles left at the full rate after this claim. — the whole claim is inside the band. |
| Amber | This claim goes past 10,000: 240.5 mi at 25p (HMRC approved rate above 10,000), £72.15 less than at the full rate. |
The total miles sit bottom left as 1750.5 total miles, with Cancel and Confirm Claim on the right. Confirming gives you 3 journeys claimed — that toast always says "journeys", even for one. Only a personal car's journeys feed the before-and-after panel, so a company car's miles in the same batch add nothing to it.
Claiming a single journey from its row asks Convert to expense claim? and prices it fresh before it asks. Where it crosses the line the question spells out the split, and where claiming it on its own would be worth something different from the figure in the list, it says both: 154 miles, Yard → Site A → Yard — £68.50 — 100 mi @ 55p + 54 mi @ 25p: past 10,000 business miles in 2026/27 (the list shows £38.50 assuming earlier journeys are claimed first; claimed on its own now it is £68.50). Yes, create claim commits it.
Whichever route you take, the split is written into the expense claim itself. The claim's notes carry Past 10,000 business miles in tax year 2026/27: 240.5 mi paid at 25p (HMRC approved rate above 10,000)., and a blanket extra rate entered on a batch adds Includes blanket additional 5p/mile above it. Once a journey has been claimed, what it was worth is fixed — nothing claimed later re-prices it. Stored rates are never rewritten either, so an old journey logged at 45p stays 45p.
"Location access denied. Please allow in browser settings."
The browser blocked GPS for the site.
Allow location access for CrewBook in the browser settings and press Locate again — or type the addresses and use the road-distance calculator instead.
No standard rate fills in for a company vehicle
The worker's engine size is missing from their record, the vehicle is electric (no advisory rate), or the rates haven't been fetched.
Set the vehicle type and engine size on the worker record; an admin can pull the latest rates via Settings → Fetch Fuel Rates (a failed fetch never wipes the existing rates).
"Could not find one of the addresses"
The address couldn't be located, or no driving route was found.
Use a fuller address with the postcode — or type the miles in yourself.
A claim came out lower than miles × 55p
The claimant has passed 10,000 business miles for the tax year, so some or all of those miles are paid at 25p.
Check the tax-year card above the list: it shows how much of the band is left, and an amber row in the journeys-to-claim list shows which journeys are split. This isn't an error — 55p only covers the first 10,000 business miles a person drives between 6 April and 5 April. The exact split is written into the claim's description and notes on Petty cash & expenses.
The confirm dialog quotes a different amount from the row
The list prices every journey as though the ones before it have already been claimed. Claim one on its own, out of order, and it takes whatever band is actually free at that moment instead.
The dialog says so in as many words — the list shows £38.50 assuming earlier journeys are claimed first; claimed on its own now it is £68.50. The dialog's figure is the one that will be claimed. Claim in date order, or use Claim All, and the two agree.
"The 55p/25p split is in the claim notes but could not be saved on the journeys yet (MileageLog needs publishing in the Builder)."
The claim went through, but the journey record can't yet hold the 55p/25p split — the mileage fields it is written onto haven't been published in the Builder.
The claim is unaffected: its amount is right, and its description and notes carry the breakdown in full on Petty cash & expenses. All that's missing is the copy of the split on the journeys themselves, so a claimed row shows one rate rather than the two halves. An admin publishing the mileage entity in the Builder clears it, and claims made after that stamp their journeys as well. A single journey says the same thing in the singular — …could not be saved on the journey yet…
"The claim's value changed while you were reviewing it (another claim was made). Check the new figures and confirm again."
Somebody else claimed journeys for the same person in the same tax year while your review was open, so the band moved underneath it. Rather than write a figure you never saw, CrewBook stops.
Nothing was written and no miles are lost. The list refreshes itself, the window stays open and re-prices itself — read the new before-and-after figures and confirm again. A single journey gives the same guard in different words: This journey's value changed while you were confirming — check it and claim again.
"These journeys belong to 2 people (…). A claim is for one person…"
The ticked journeys aren't all the same worker's, and one claim can only be made for one claimant.
Confirm Claim stays greyed out until they are. Close the window, choose the worker at the top of the page, claim their journeys, then do the next person.
"Could not count this year's business miles, so the claim cannot be checked against the 10,000-mile band. Close and try again."
The year's journeys couldn't be read back from the server, so there's no safe way to know where the claimant sits against 10,000.
Confirm Claim stays disabled and nothing is written. Close the window and try again. The card above the list reports the same problem in red — Could not count Joe Bloggs's 2026/27 miles. Values of journeys to claim may not show the 25p rate above 10,000. — so treat the values in the list as unreliable until it clears.
The Claim buttons are greyed out
The worker records haven't finished loading. Until they have, CrewBook doesn't know who is on a personal car and who is on a company car — and it would rather wait than split a company car's miles at 10,000 by mistake.
Give the page a moment: Claim, Claim Selected and Claim All come back on their own. If they stay greyed, refresh the page.
Invoice checking#
The Invoice Checking page has four tabs that together make sure nothing goes unbilled and no supplier overcharge slips through.
Jobs to Invoice#
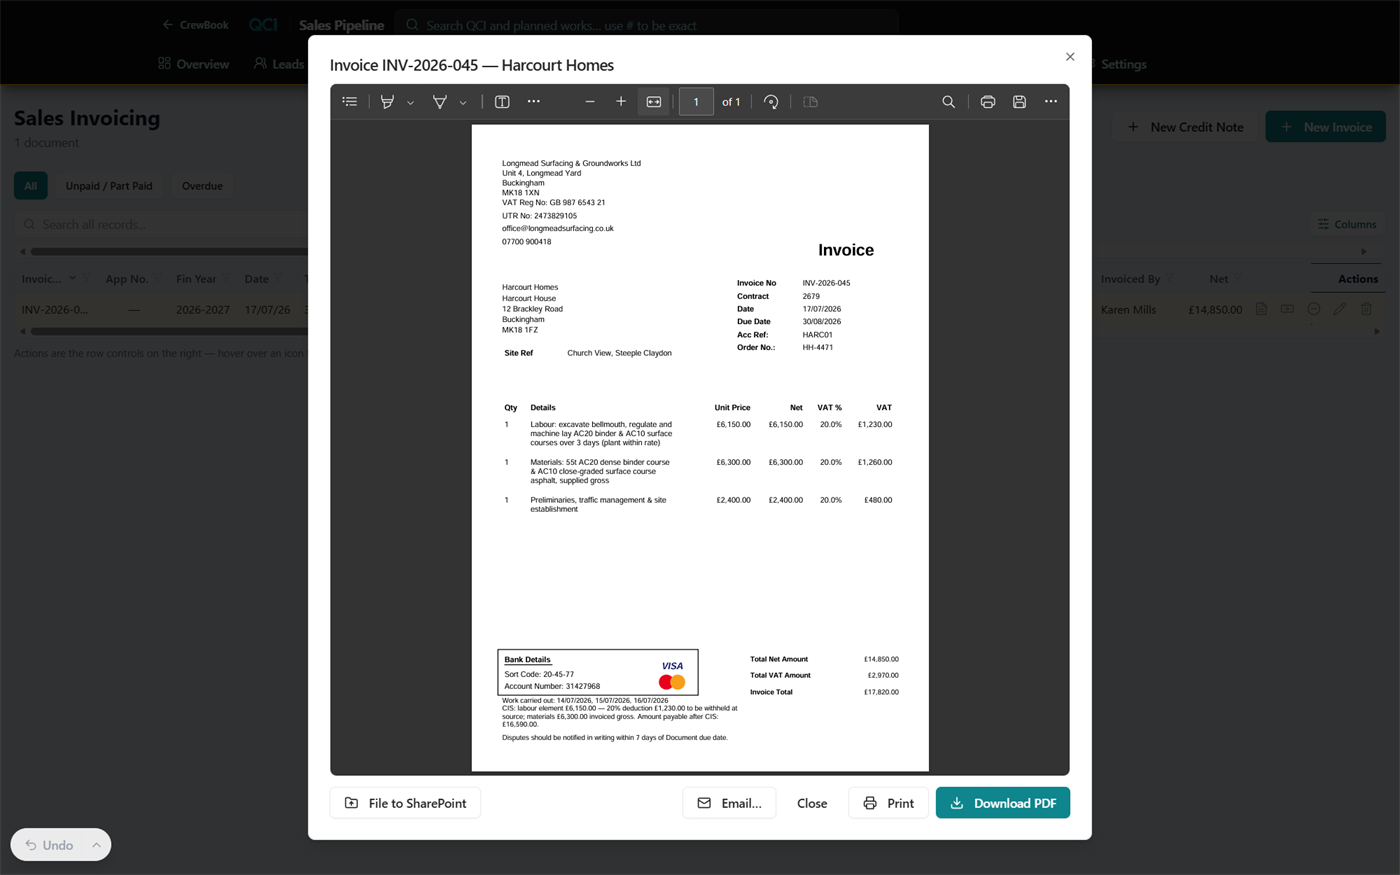
Every contract with days of work not yet billed to the client, one amber card each. Click Mark as Invoiced, tick the date chips the invoice covers, set the date and save — those days flip to Invoice Issued and drop off. Or send the paperwork to the office instead: Raise draft document sends a draft invoice, credit note, proforma or application to the front desk, who add the detail, check the VAT and issue it with the next document number (see the QCI area).
Purchase Invoices#
Line-by-line reconciliation of supplier invoices against what was ordered — materials, hired plant, dayworks, subs and haulage. The Diff column tells the story: a green tick is matched, an amber clock means no invoice received yet, a red figure is an overcharge, purple means a query is open. Filter with Differences only, No invoice received and Queries Pending; clicking a row opens that day in Day View, and the back arrow there returns you to Invoice checking rather than the Calendar.
The page remembers where you were. The tab you're on, whatever is typed in Search by supplier, ref, contract..., all three filter toggles and any open query are kept in the page address. Refresh, bookmark it, send it to a colleague or come back with the browser's back button, and the same view comes back — including the query dialog, reopened on freshly loaded figures rather than a stale copy. Typing in the search box and flicking filters doesn't pile up browser history either, so back still takes you where you actually came from.
- Work the Differences only list: for each red figure, either tick Invoice OK to accept it, or click + Raise Query.
- A query records the date, who raised it, the reason (price, quantity, quality, delivery, wrong job…) and the details — and can be emailed straight to the supplier's Queries To contact, copy to you.
- If the query isn't resolved within 7 days, whoever raised it is emailed a reminder — repeating weekly until it's marked Resolved. When the credit note lands, click Credit Received. Both are toggles that tick themselves once set: Resolved becomes ✓ Resolved, Credit Received becomes ✓ Credit Received.
A query has three states, and they no longer look alike. Untouched, the control reads + Raise Query. Once raised it reads Queried: 14 Sep with the reason beside it, in purple, and clicking it reopens the query to edit (the dialog is titled Edit query rather than Raise a query, and offers Remove Query). Once ticked ✓ Resolved it keeps its date but drops to a quieter outline. The same control sits on a job in Day View, where it reads Raise a query and then Queried 14 Sep — and Other Costs rows carry it too, so a disputed one-off cost is chased exactly like a disputed load of material. An open query and a resolved one used to look identical, which is how a settled query got chased a second time.
You can open the cost line behind a query without losing your place. Near the top of the query dialog, under the item it refers to, is Open item in Dayview job edit. It takes you to that cost's job in Day View, on the right date, with the job window already on the tab the cost sits on — a material line opens Materials, hired plant opens Hired Plant, a subcontractor opens Subcontractors, plant haulage opens Own Plant, and grab lorries, material testing, traffic management and drawings open Other Costs. Correct what needs correcting, then click Back to query at the top left of the job window's header: you land back on Invoice checking with the tab, the search, the filters and that same query dialog exactly as you left them. The button is greyed out for the moment a query is saving, and it isn't shown at all on a cost line CrewBook can't tie to a date.
Suppliers#
The supplier list behind all of this: account code, legal and display names, the Queries To email, and the CIS toggle (CIS suppliers export with reverse-charge VAT code T21). Click any cell to edit in place. Suppliers created in a hurry carry the code PENDING, highlighted amber, until the real code from your accounting system is entered.
Export#
Downloads invoiced purchase costs as a CSV in your accounts import layout, then stamps each record so it's never sent twice. Set the date range, check the preview ("Ready" rows go in the file), and click Download CSV. Only costs with an invoice reference and a contract number matching a live job export — anything blocked is listed in red with "needs a contract number", stays unstamped, and gets picked up automatically once fixed.
If something's not right#
"No query contact set for this supplier"
The supplier record has no Queries To email, so the query can't be emailed (it's still saved on the item).
Add the address on the Suppliers tab, then reopen the query and send it.
"N invoiced costs were left out of the CSV — needs a contract number"
Those costs have no contract number, or theirs doesn't match any live job.
Open the red list, add a valid contract number to each item's job, and run the same date range again — only the previously blocked rows will be new.
"CSV downloaded, but N records were NOT marked as exported…"
The file downloaded but some rows failed to get their exported stamp — they'll show as "Ready" again next run.
Those rows ARE in the CSV you just downloaded. Don't export them again blindly, or your accounting system gets them twice — exclude them from the next file, or de-duplicate on import.
"Draft saved. No notify email is set in QCI → Settings…"
The draft reached the front desk's queue, but nobody was emailed about it.
Tell the front desk directly this time, and set the draft notifications email in the QCI Settings so future drafts announce themselves.
The job window opened on the wrong tab
Not every cost type has a tab of its own, and a few open Materials when the line actually lives elsewhere. Daywork, haulage and opening charges belong to the Haulage / Charges card on the job's Summary tab, and a line typed simply as "Other" sits on Other Costs.
The line is on the job — just not on the tab you landed on. Click Summary for daywork, haulage and opening charges, or Other Costs for an "Other" line. A split load charge is the exception among these: it really is on Materials, shown inside the material row it belongs to. An unrecognised tab never leaves you with a blank pane — the window falls back to Summary.
There's no "Open item in Dayview job edit" button on a query
CrewBook couldn't work out which day to open. The cost line matches no job — neither by its own job nor by contract number and date — and carries no date of its own.
Put a contract number and a date on the job the cost belongs to, then reopen the query. The same gap makes the row unclickable in the list: a row with no date has no pointer cursor and doesn't respond.
"Back to query" isn't on the job window
That button only appears when you arrived from an open query. Clicking a purchase-invoice row opens the day with no query to go back to.
Use the back arrow instead — from a purchase-invoice row it still returns you to Invoice checking, not the Calendar. To come back to the query itself, open the row's query first and go through Open item in Dayview job edit.
Credit checks#
The Credit page lists every upcoming, non-provisional job whose credit status is still Needs Checking or No Credit — soonest first, each card showing the contract's estimated value against the client's live Available Credit (their limit minus outstanding invoices; red means already over). A similar tally appears on the Dashboard's Credit Check card.
- Wait for the Available Credit figure to load (it shows a spinner rather than a possibly-wrong number).
- Pick the outcome under Update credit status: OK, No Credit, Percentage Upfront (with the %), or Special Authority (with who authorised it).
- Click Save Status — the status copies to every other day of the same contract automatically.
- Need more headroom instead? Request Credit raises a credit limit request to whoever decides — its progress then shows on the card.
Costings — the monthly P&L#
Costings is the per-contract profit and loss: every job's subcontractors, materials, hired plant, own plant, small tools and labour against its sales — live from the QCI invoicing, updating automatically. Pick Monthly, FY YTD (from 1 April) or CY YTD (from 1 January); click any row to drill into the contract's full cost breakdown, down to the individual items and the days they sit on.
Where to find it, and who can. Costings sits in the QCI area, as the Costings tile under Pricing & performance on the QCI Overview. It is no longer in the Admin menu, and the old address still works — an old bookmark lands in the right place. Access is its own Costings page chip rather than a rank: Admin and Super Admin have it by default, and an admin can switch it on for an Office or Site Staff login from Admin → Users & Access without handing over anything else. The Accrual Log is behind the same chip, being a drill-down of the same figures.
It opens on last month, not this one: costings are worked in arrears, and the current month is still filling up with jobs. Change the month at the top when you want a different one.
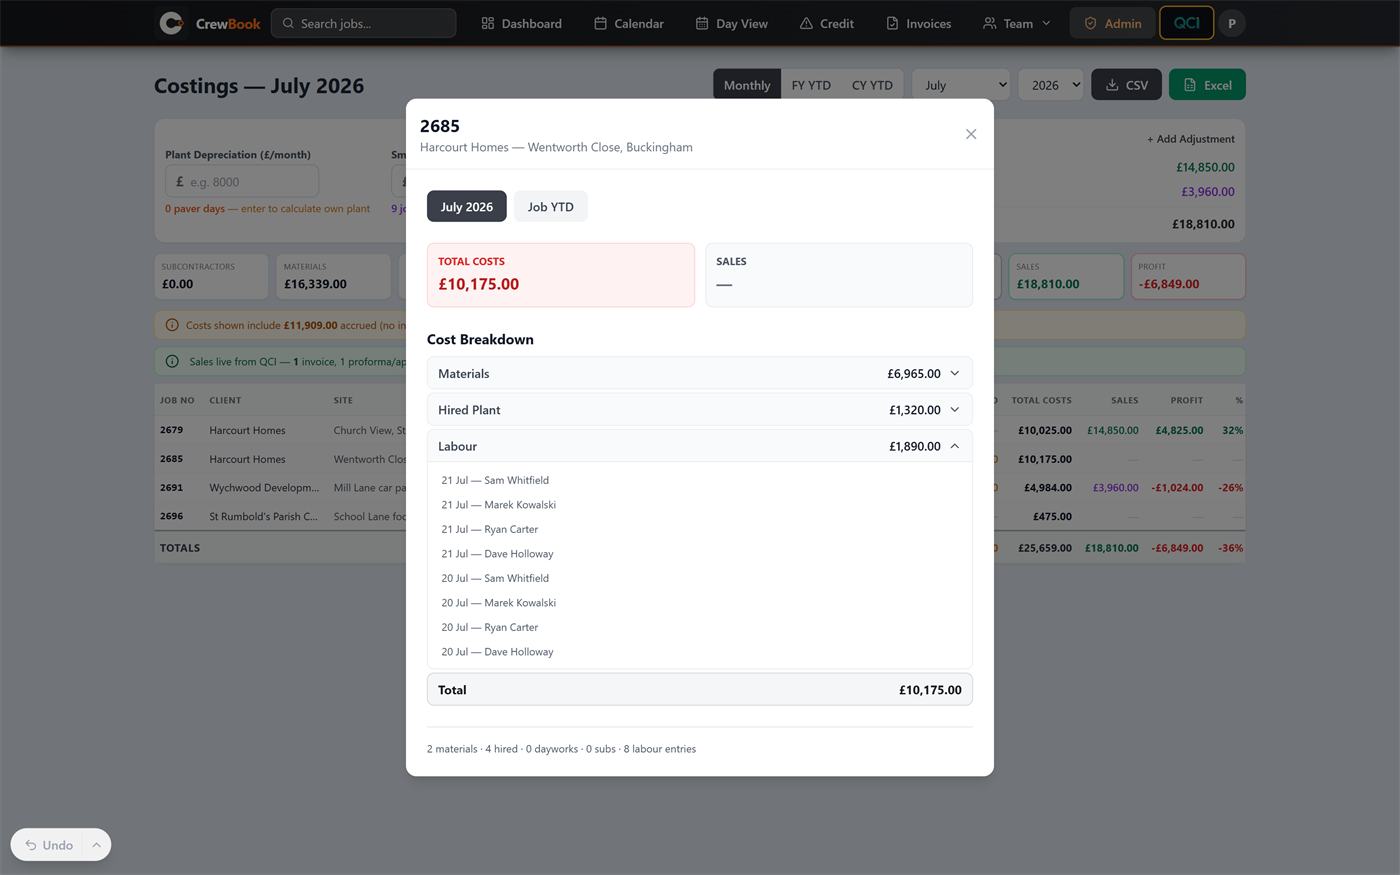
- Overheads — enter Plant Depreciation (£/month) (divided across the period's paver days for the Own Plant rate) and Small Tools & Plant Repairs (£/month) (spread across every job day). Both save as you type, per period. A report covering several months adds up each month's own figures rather than repeating one month's across the window, so a quarter or a financial year recovers what you actually entered. Months you never filled in recover nothing, and the Contract Profitability report names them.
- Reading the Sales column — green is invoiced; purple includes proforma/application revenue or an adjustment (marked *); a timing badge means the invoice was issued in a different month — ← Prev mth, Next mth →, ← / → when it is split across both, or Other mth for anything further away; a red REMEDIAL badge means no sales are expected. The badge now comes from the sales documents themselves rather than a hand-set invoice date on the job, so contracts that used to show a blank Sales column and no badge at all — and so read as never invoiced — are correctly marked as billed in the month next door.
- Moving revenue between months — the Income Deferrals & Accruals panel records a deferral (push revenue later) or an accrual (pull it earlier) per contract, and both months' figures adjust with the * marker.
- Exports — CSV or a styled Excel workbook including the overhead inputs and the adjusted revenue summary; Report opens the matching Contract Profitability report for the same period.
Month-end accruals and the Accrual Log#
Amber figures are accrued costs — recorded on jobs but with no supplier invoice yet. At month end, enter the date the management accounts were prepared and click Freeze accruals at this date: a snapshot of everything accrued is frozen, with the total, line count and who took it. The Accrual Log page then compares that frozen list against reality, month by month: green Invoiced lines arrived in time, blue Came in late lines landed after the cut-off (normal — they hit a later month in your accounts), and red Still open · Nd lines have had no invoice at all — your chasing list, exportable as a CSV for the accountant.
If something's not right#
Sales and profit columns show "Loading sales…" or dashes
The live sales figures haven't finished loading from the invoicing module.
Wait for the green "Sales live from QCI" bar before reading profit; if it shows an error, reload the page.
The Own Plant column is all dashes
Plant Depreciation (£/month) is empty, there were no paver days in the period, or no paver plant types are configured.
Enter the monthly depreciation figure, and check the paver plant types in the company settings.
"Freeze accruals at this date" is greyed out
No prepared-on date has been entered, or there are zero accrual lines.
Fill in Management accounts prepared on first; if nothing is accrued, there's nothing to freeze.
An Accrual Log line shows "Record deleted"
The cost record that was accrued has since been deleted from its day.
Check with whoever manages that job's records — the accrued amount may need reversing in the accounts. The frozen snapshot deliberately keeps the evidence.
Reports#
The Reports page is the catalogue of everything the app will total, filter, print and export for you. Open it from the Reports tile on the QCI Overview, or from Insights via Reports & exports at the top right. The cards are grouped: People holds the Absence & Cost report, Money holds Contract Profitability and Invoices Not Received, and Sales & Credit holds Aged Debtors, the Retention Register and Chasing Effectiveness — the three documented in the CrewQCI guide, which behave identically here.
Every report works the same way: filters across the top, key figures, a chart, a sortable table, and PDF / Excel / CSV downloads that match exactly what is on screen. Each carries a collapsible How these figures are calculated panel, and those same plain-English assumptions print on the PDF and in the Excel Basis sheet — so a figure can go to your accountant with its rules attached. Filters live in the web address, so a report can be bookmarked or its link shared. Reports are admin-level.
Reports covering a span of time share one Period picker: Month, Last month, Last 3 months, Last 6 months, Last 12 months, Financial year to date, Full financial year, Last financial year, Calendar year to date, Calendar year and Custom range. Financial years run April to March. The Year box reaches ten years back and one year forward.
Contract Profitability#
The Costings page for a whole period rather than one month: every contract's costs against its sales, with the profit and margin worked out. The columns are Job No, Client, Site, Co-ord, then the cost breakdown — Subs, Materials, Hired Plant, Own Plant, Small Tools, Labour, Accrued, Total Cost — then Sales, Of which applied for, Profit and Margin.
Contracts with sales but no job costs are still listed — they are money in that the period can't explain — but their Profit and Margin are left blank and they are kept out of the totals, because a profit figure against no costs would be a fiction. A warning counts them: "N contracts have sales but no job cost records in this period — shown with blank profit and left out of the totals."
Invoices Not Received#
Everything you have ordered and used that no supplier has billed you for yet — the chasing list for the purchase side, and the answer to "what is still to come in?". One row per outstanding cost: Job date, Days waiting, Supplier, Type, Description, Contract, Client, Site, Expected cost, Chased and Queries to.
| Filter | What it does |
|---|---|
| Waiting | Any age (the default), 30+ days, 60+ days or 90+ days. |
| Type | All types, Materials, Hired plant, Subcontractors or Dayworks & haulage. |
| Chased | All, Query raised or Not yet chased. |
| Supplier | All suppliers, or one of them — the list is built from the suppliers actually appearing in the report, so it only ever offers names with something outstanding. |
| Client | All clients, or one of them. |
How far back it reaches is set once, by Chase purchases from under Admin → Lists & Options: job dates before it are ignored. Set it to the day you started entering purchases in the app, so work migrated from your old system isn't chased for invoices that were settled years ago. Left blank, everything is counted however old, and the report says so.
If something's not right#
"Every purchase line in the app is counted, however old."
Chase purchases from is blank, so Invoices Not Received is reaching back to your very first record — including anything migrated from a previous system, which nobody is waiting on an invoice for.
Set it under Admin → Lists & Options to the date you began entering purchases here, and the permanent backlog disappears.
A contract shows sales but its Profit is blank
It has sales in the period but no job cost records, so there is nothing to subtract. It is deliberately left out of the totals rather than shown at 100% margin.
Usually the work sits in another month, or the contract number on the jobs doesn't match the one on the invoice. Check the jobs on that number and the period you've chosen.
"No plant depreciation is set on the Costings page for …"
Contract Profitability adds up each month's own overhead figures, and those months have none entered — so no own plant or small tools cost is recovered for them.
Open Costings at each month the warning names and fill in Plant Depreciation (£/month) and Small Tools & Plant Repairs (£/month), then run the report again.
Plant-haulage rows export with no Supplier Ref
Plant haulage supplier in Settings is blank, or the name in it doesn't match a record on the Suppliers tab. A plant movement records what moved, not who moved it, so the export has nothing to look up.
Set the name exactly as the supplier is stored, and check that supplier has an account code. Until then the column is left empty for the bookkeeper to complete — which is safer than guessing an account.
The QCI sales area#
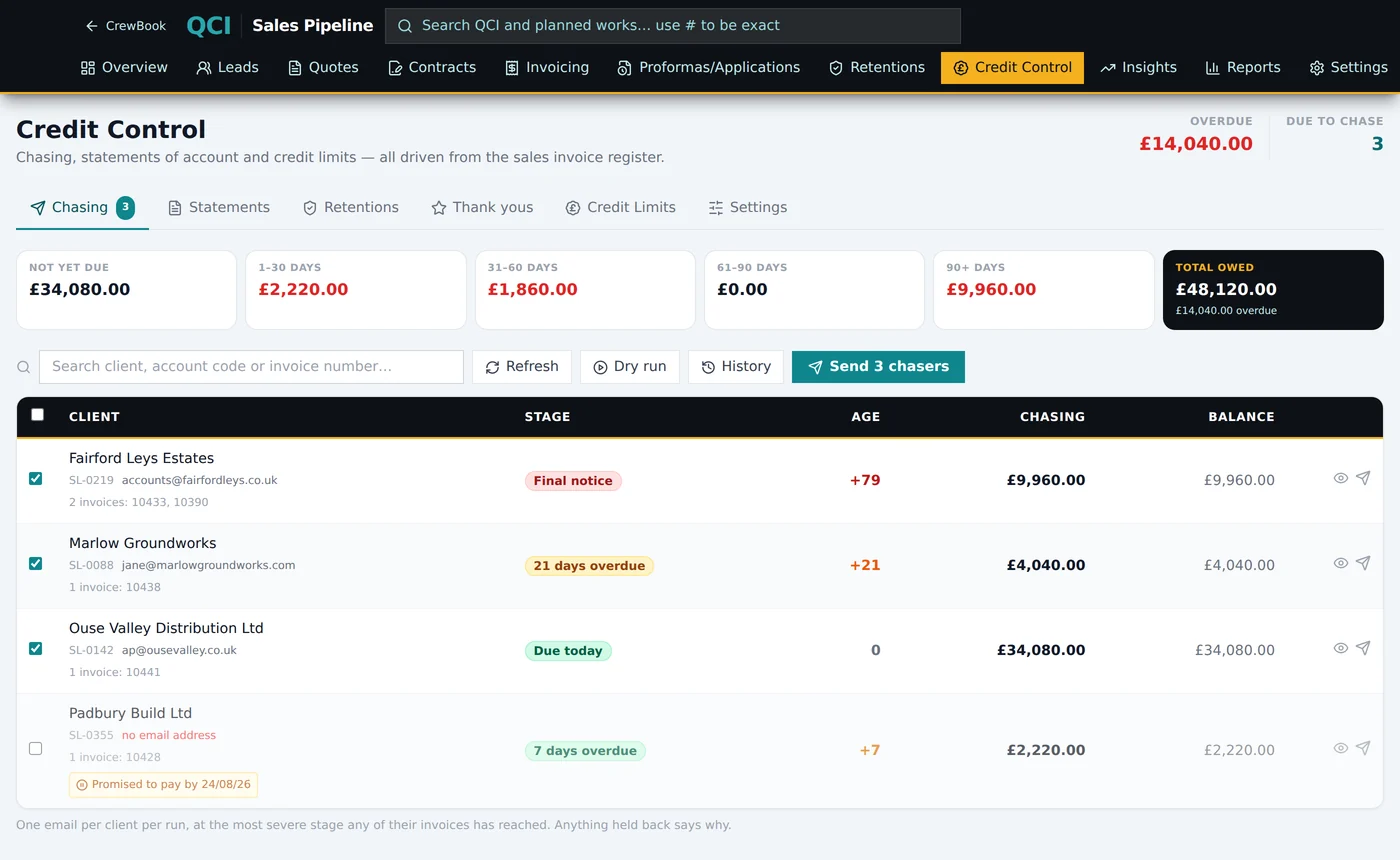
Sales lives in its own area — QCI — with its own dark teal-and-gold look: leads, quotes, contracts, invoicing, proformas and applications, retentions, credit control, prospecting, insights and reports. It's the same sales pipeline as the standalone CrewQCI product, woven into your schedule — so this chapter covers how the two sides join, and the CrewQCI user guide covers every sales page in full detail. The ? Help button in the QCI header takes you straight there, at the chapter for the page you're on.
Getting in and out#
Click the QCI logo button (the dark pill with a gold border) in the top navigation — or the bottom bar on a phone. You land on the QCI Overview with its own pill bar: Overview, Leads, Quotes, Contracts, Invoicing, Proformas/Applications, Retentions, Credit Control, Prospecting and Insights. The Overview itself carries two figures in its header — Outstanding today and Overdue, red as soon as there is any — and groups its tiles in the order the work happens: Sales pipeline (Leads, Quotes, Contracts, Prospecting), Money in (Invoicing, Proformas/Applications, Retentions, Credit Control), Pricing & performance (Costings, Insights, Reports) and Records & setup (Clients, Settings). Several tiles carry a live pill: Leads "N new", Invoicing the outstanding total, Credit Control the overdue count (green at nought, red above it), Clients how many are on file. Below them sits the Overdue invoices table — invoice, client, due date, days overdue, credit limit and owing — showing the worst eight, with Show all N overdue to open the lot and Show the worst 8 only to fold it back. Three areas sit off that bar, and all three are tiles on the QCI Overview: Settings is also the ⚙ cog in the QCI header, next to the ? button; Reports also opens from Insights via Reports & exports at the top right; and the client register is the Clients tile. ← CrewBook at the top left brings you back. The button only appears for users with the QCI Sales page permission (Admin and Super Admin tiers have it by default). The QCI search box reads "Search QCI and planned works… use # to be exact" — results include a "Job days (The Book)" area, so one search spans sales and the schedule.
Searching sales and the schedule together#
Press Enter in the QCI search box for the results page. Results are grouped into one card per area — clients, credit control, leads, quotes, contracts, invoices and credit notes, proformas and applications, retentions, prospects, suppliers and job days — with a count strip across the top showing which areas the term appears in. Click a count to jump to that card, or any result to open the record on its own page. Areas with hits sort to the front, and a long list shows the first six with Show {n} more underneath.
The search runs on the server — each area asks the database for its matches rather than downloading a register into your browser — so it reaches your whole history rather than the most recent few thousand rows.
- Each area returns at most 200 matches. An area that fills up shows its count as 200+ instead of a number: narrow the term, don't assume 200 is all there is.
- An area that fails says so. Its card reads "Couldn't search job days (the book) — there may be matches here" with a Retry button, and a line above the results names every area that failed. A broken area is never reported as an empty one.
- Punctuation and spacing are ignored, so "A & C Hobbs", "A and C Hobbs" and "A+C Hobbs" all find the account stored as "A&C Hobbs Ltd". Company endings like Ltd and plc are ignored too — the same client is rarely typed the same way twice.
- Client accounts match on their alias names as well, so a merged account is found under every name it has ever been invoiced under.
- Prefix with # (e.g. #6532) for an exact reference search — it matches the whole number only, so #6532 will not return 16532.
- Job days show upcoming first, then past; cancelled days are left out. Each one opens straight into Day View.
Drafts: from the job to the front desk#
The flagship join. A coordinator on a job can send the billing to the office without ever entering QCI:
- On the job's Summary tab, click Raise draft document (under the invoice status bar) — no QCI access needed.
- Work down the numbered cards: Document type (Invoice, Credit Note, Proforma or Application for Payment), Job days covered, What's being charged, Money & terms, Customer address and Notes for the front desk. Under Job days covered, un-invoiced days start ticked, remedial days unticked, and already-billed days show an Invoiced badge.
- Add the priced lines under What's being charged — these print on the document, so the front desk is not guessing what the job was. In any details box, Shift+Enter starts a new line within the same priced item; plain Enter does nothing, so a stray keystroke can't add a blank line.
- Set the net amount, VAT and payment terms under Money & terms, check the printed Customer address, then Send to front desk.
- The ticked days flip to Draft Invoice Raised (blue), the job gains a Draft with front desk chip, and the office is emailed — to the Draft notifications email set in QCI Settings.
- At the front desk, the draft waits in the Draft documents panel at the top of the QCI register. Opening it shows the coordinator's note; the office adds line items, checks the VAT, and clicks the green Issue — which is the moment the next document number is allocated. A prompt then offers to mark the job days Invoice Issued in the schedule, closing the loop.
Contract numbers: the thread between the two sides#
- On a job, the small QCI button next to the red #contract chip jumps straight to that contract in QCI (shown when the job is genuinely linked and you have QCI access).
- In QCI, a contract's Jobs in The Book panel lists every scheduled day on that number — click one to open it in Day View.
- On an invoice, the Job days invoiced section ticks the real scheduled days the invoice bills — and warns "⚠ N ticked days are already invoiced on #…" if you're about to double-bill.
- A day's billing status can always be set by hand from the job's Summary tab — Not Invoiced (red), Draft Raised (blue), Invoice Issued (green), Proforma/Application (amber) — for one day, specific days, or the whole contract.
One client register for both sides#
The names booked on jobs and the accounts invoices are raised against are the same register. A green building icon next to a client name on a job means it's linked to an account; an amber warning triangle means no account matches — tap it and the Clients page opens with the setup form pre-filled. The Clients page also collects new-client requests raised from the field for approval, and its red panel lists any booked names with no account. Renaming an account carries the new name across jobs, contracts, quotes and invoices automatically.
What was emailed to the client, and resending it#
Every document email the app sends is kept. Open one document's history with Sent emails in its PDF preview, or a whole register's with Sent emails in the header of Invoicing or Proformas/Applications — that view has its own search across document number, client, address and subject.
Pick a send to read the email exactly as the client received it, change the address under Resend to (change the address if needed) if it needs to go somewhere new, and click Resend. A resend reuses the PDF that actually went out and gives it a fresh 30-day download link, so the client gets the same paperwork with a working link rather than a rebuilt document.
If you've used standalone CrewQCI#
Everything central works the same — registers, document numbering, credit control, retentions, prospecting, reports, Sage exports, settings. The differences: you enter with the QCI button rather than a separate login; access is CrewBook's QCI Sales permission; search also covers the schedule; invoices tick real job days instead of a typed date list; the draft-from-job flow exists; and there is no workbook Import page.
If something's not right#
There's no QCI logo button in my navigation
Your account doesn't have the QCI Sales page permission.
Ask an admin to turn on the QCI Sales chip in Admin → Users & Access — Admin and Super Admin tiers have it automatically.
"Draft saved. No notify email is set in QCI → Settings…"
The Draft notifications email in QCI Settings is blank, so no email went to the office. The draft itself is safely in the drafts panel.
Tell the front desk directly this time, and fill in the address under QCI → Settings → Bank & document text.
The green Issue button is greyed out on a draft
The net amount is zero — a document can't be issued for nothing.
Add the line items or a net amount first; for proformas, a "Needed before issuing: …" toast lists exactly what's missing.
"⚠ N ticked days are already invoiced on #…"
Another issued invoice already claims those job days — you may be about to double-bill.
Untick the days unless you genuinely mean to bill them again. Drafts never claim days, so they never trigger this.
A client's balance looks split across two accounts
The client has been invoiced under two names and one became its own account instead of an alias.
On the Clients page, use Link to roll the extra name into the real account — balances and history combine.
Settings#
The Admin button (top right) opens the settings page — "System settings, backups and admin tools". Changes save automatically as you leave each field; there's no Save button. The cards, top to bottom:
- Quick links — Backup & Restore, the in-app User Guide, Re-run Setup (walk the setup wizard again), Data Explorer (Super Admins only) and Your account. Costings is not among them any more — it is a tile on the QCI Overview.
- Integrations — WhatsApp, email, SharePoint and the backup destination: covered in the next chapter.
- Users & Access — invites, tiers, page chips and linked workers: covered under your team.
- Recipients — who gets emailed about credit limit requests, new client requests and approvals, plus the Expense approver email and Expense payer email. An empty list means "saved but not emailed", so fill these in early.
- Lists & Options — the dropdown lists used across the app: sectors, lead sources, payment terms, quote statuses, credit authorisers, job titles, plant/equipment types, the Dashboard tonnage suppliers and paver plant types, and the Day View heavy plant list. Type and press Enter to add; × to remove. Two free-standing fields at the foot of the same card drive the purchase side:
- Plant haulage supplier — "Who carries your plant between sites. Shown as the supplier on plant-haulage lines in Purchase Invoices (blank = no supplier on those lines)". Type the name exactly as it appears on the Suppliers tab: the Sage export looks it up there and writes that supplier's account code into the Supplier Ref column on every plant-haulage row. Left blank, or set to a name with no supplier record behind it, those rows export with Supplier Ref empty for the bookkeeper to complete — which is what they always did before this field existed.
- Chase purchases from — "The date you started entering purchases here. Invoices Not Received ignores anything earlier, so migrated history is not chased (blank = everything)". It is the reach-back for the Invoices Not Received report and nothing else.
- Suppliers → Sage — exports supplier records in the Sage template, stamping what's been sent.
- Backup & Restore and HMRC Fuel Rates — below.
Integrations: WhatsApp, email, SharePoint#
WhatsApp job briefs (Twilio) — the one-off setup#
Briefs go out from your company's own WhatsApp number via your own Twilio account, so replies come to you. The setup takes about 20 minutes plus WhatsApp's approval time:
- Create a free account at twilio.com and add WhatsApp to a number (Twilio Console → Messaging → Senders → WhatsApp senders). WhatsApp's approval of your business can take a day or two.
- Copy your Account SID (starts AC) and Auth Token from the Twilio Console home page into the WhatsApp card on Admin → Integrations, plus your WhatsApp number (e.g. +447123456789).
- Open How to set this up on the card and create the two message templates in Twilio — one for job briefs, one for appointments. The exact bodies are provided word-for-word with Copy buttons, so approval is usually straightforward (minutes to a few hours).
- Paste each approved template's Content SID (starts HX) into Job brief template SID and Appointment template SID.
- For delivery ticks on the Message Delivery page, set the status callback URL from step 5 of the walkthrough on your Twilio WhatsApp sender.
- Turn on Enable WhatsApp sending, then use Send test with your own number — "Test message sent — check your WhatsApp."
Email#
No setup needed — notifications, wage summaries and sales documents are emailed automatically under your company name. If you'd rather sends came from your own mailbox, set the Preferred connected mailbox (Outlook or Gmail) and the Sender name on emails.
SharePoint#
Optional — "File the sales documents CrewBook produces onto your SharePoint site, and keep your nightly backup there." Enter your SharePoint site name (part of the site's name is enough; this is the field that makes the connection work) and turn on Use SharePoint. You may also need to connect your Microsoft account in Settings afterwards. Filing documents and backups is all it does now. Looking a contract up when you book a job no longer goes near SharePoint — that reads your own contract register, so it works whether you use SharePoint or not.
If something's not right#
"No Twilio credentials are configured…" on a test send
One or more of the three credential fields is empty.
Fill in the Account SID, Auth Token and WhatsApp number on the Integrations card, then retry.
"WhatsApp is connected but the message template SID is missing."
The template's Content SID hasn't been pasted in yet.
Copy the SID (starts HX) from Twilio's Content Template Builder into the template SID field. If the template is brand new, WhatsApp may still be reviewing it — a few hours' wait is normal.
A test send fails with a raw Twilio error
Twilio rejected the send — unapproved template, unverified number, or wrong credentials.
The toast shows Twilio's own error text, code and link — follow it in the Twilio Console.
Delivery status never updates on Message Delivery
The status callback URL isn't set on your Twilio WhatsApp sender, so Twilio has nowhere to report to.
Copy the callback URL from step 5 of "How to set this up" into the sender's settings in Twilio.
Backups and restore#
Backups write a complete snapshot of every data table to your own Google Drive — under "CrewBook Backups / your company / date /", one file per table plus a manifest listing exactly what was taken. CrewBook can only see the backup files it creates, not the rest of your Drive, and your Twilio auth token is deliberately never written to a backup file (re-enter that one field after a restore).
- One-off: under Admin → Integrations → Backups, set Where backups are written to My Google Drive and click Connect Google Drive.
- On the Backup page, click Back Up Now and wait for "Backup complete — N records across N tables saved to your Google Drive".
- To restore, expand a snapshot and run the safe two-step flow: Check what would be restored first (a dry run reporting "N missing" or "✓ All present" per table, changing nothing), then Restore N records. Restores only ever add back missing records — existing records are never overwritten.
"Backups aren't set up yet"
No backup destination has been chosen, or the Google account isn't connected.
Admin → Integrations → Backups: pick My Google Drive and click Connect Google Drive. If the sign-in popup won't open, allow pop-ups for CrewBook.
"Backup stopped before writing anything: some of your data could not be read."
One or more tables failed to download, so no partial backup was written — deliberately.
Try again; if it persists, email Peter. Nothing misleading was saved to Drive.
"No backups found yet" even after backing up
The on-page snapshot list shows operator-managed snapshots; your own manual backup went to your Google Drive.
Check Drive under "CrewBook Backups / your company /" — the files are there. For a restore from the on-page list, ask the operator.
Message delivery#
The Message Delivery page (Team → Message Delivery) is the audit trail for every WhatsApp brief: grouped by job, with per-job counts of delivered, read and failed. Each message shows the worker (matched from their phone number), the status — Queued, Sent, Delivered (green tick), Read (blue eye), Failed / Undelivered (warning) — and, for failures, Twilio's exact error text in red. Filter by status to list only the failures; anyone not on delivered or read is worth a phone call.
A message shows "Unknown" instead of the worker's name
The number the brief went to doesn't match any phone number on the Workers page.
Fix the number on the worker's record — future messages will match.
Messages stay on "Sent" and never show Delivered or Read
Twilio isn't reporting status back — the status callback URL isn't configured on your WhatsApp sender.
See integrations, step 5 of the WhatsApp walkthrough.
Data explorer#
For Super Admins only: a read-only browser over every data table in the app, grouped by area — the raw records behind every page. Pick a table, search the loaded rows, click a row to see every stored field. It answers "what exactly is stored?" — all changes still happen on the normal pages, and company settings (which hold your Twilio credentials) are deliberately not browsable. The search only covers rows already loaded, so click Load more first when hunting something old.
Troubleshooting index#
Every fix in this guide, gathered in one place. Each entry links to the full answer in its chapter — or type what you're seeing into the search box in the contents panel.
Creating your account and signing in
- "Invalid email or password" when logging in
- "Invalid verification code" when signing up
- "Invalid reset link" when resetting a password
- "Access Restricted — you are not registered to use this application"
- The cookie banner has gone and you want to change your answer
Your company, the setup wizard and subscribing
- You were invited, but you see "Create your company"
- The setup wizard keeps reopening at every login
- "Run the setup wizard first to create your company settings…"
- Everyone suddenly sees the subscribe screen
Calendar
- The contract search shows "No contracts found"
- A job can't be dropped on a particular day
- "Failed to create job / move job / delete job — please try again."
- No green "+N" capacity number on a day
Day View
- A worker isn't in the Unassigned Workers pool
- A plant chip has gone red with "⚠ 3/2"
- "Failed to save — please try again."
- "[Worker] is already on this job"
- Ticking a Split Load charge ticks its material too
The job editor
- Plant changes disappeared
- "Updated this day, but N other day(s) on contract #X didn't sync."
- Rows in Job details won't open for editing
- The editor closed by itself
- Files uploaded from site but no email reached the office
- A note I typed isn't in the Saved notes list
- Saved a note but the office didn't get an email
WhatsApp job briefs
- "Failed to send to: …" for some workers
- "No phone numbers found"
- No WhatsApp buttons anywhere
- The preview shows an error with a Retry link
Live job map
Holidays
- Approvals work but nobody receives the emails
- A pending holiday doesn't show on the Day View
- The Add button is greyed out
Wages
- A worker is missing from the wage grid
- A bank holiday shows as "Holiday" — or isn't paid at all
- Rate columns are missing, or blank in the download
- The link in an old wages email doesn't work
Absence & Cost report
- Days are listed but cost £0
- The total doesn't match the management accounts
- "No records for this period."
Petty cash and expenses
- "Admin Only" screen instead of the Petty Cash page
- No approval emails are going out
- "No petty cash claims to export for this month"
Mileage log
- "Location access denied. Please allow in browser settings."
- No standard rate fills in for a company vehicle
- "Could not find one of the addresses"
- A claim came out lower than miles × 55p
- The confirm dialog quotes a different amount from the row
- "The 55p/25p split is in the claim notes but could not be saved on the journeys yet (MileageLog needs publishing in the Builder)."
- "The claim's value changed while you were reviewing it (another claim was made). Check the new figures and confirm again."
- "These journeys belong to 2 people (…). A claim is for one person…"
- "Could not count this year's business miles, so the claim cannot be checked against the 10,000-mile band. Close and try again."
- The Claim buttons are greyed out
Invoice checking
- "No query contact set for this supplier"
- "N invoiced costs were left out of the CSV — needs a contract number"
- "CSV downloaded, but N records were NOT marked as exported…"
- "Draft saved. No notify email is set in QCI → Settings…"
- The job window opened on the wrong tab
- There's no "Open item in Dayview job edit" button on a query
- "Back to query" isn't on the job window
Costings — the monthly P&L
- Sales and profit columns show "Loading sales…" or dashes
- The Own Plant column is all dashes
- "Freeze accruals at this date" is greyed out
- An Accrual Log line shows "Record deleted"
Reports
- "Every purchase line in the app is counted, however old."
- A contract shows sales but its Profit is blank
- "No plant depreciation is set on the Costings page for …"
- Plant-haulage rows export with no Supplier Ref
The QCI sales area
- There's no QCI logo button in my navigation
- "Draft saved. No notify email is set in QCI → Settings…"
- The green Issue button is greyed out on a draft
- "⚠ N ticked days are already invoiced on #…"
- A client's balance looks split across two accounts
Integrations: WhatsApp, email, SharePoint
- "No Twilio credentials are configured…" on a test send
- "WhatsApp is connected but the message template SID is missing."
- A test send fails with a raw Twilio error
- Delivery status never updates on Message Delivery
Backups and restore
- "Backups aren't set up yet"
- "Backup stopped before writing anything: some of your data could not be read."
- "No backups found yet" even after backing up
Message delivery
- A message shows "Unknown" instead of the worker's name
- Messages stay on "Sent" and never show Delivered or Read
Questions people ask
- What does CrewBook cost, and how does the trial work?
- Do my workers need their own logins?
- A page my colleague has is missing from my menu
- A job's been rained off — cancel, move or delete?
- Whose number do WhatsApp briefs come from?
- I've heard about Fleet, Training and Personnel pages — where are they?
- Can I get my data out?
- Where's the detail on leads, quotes, invoicing and credit control?
Questions people ask#
What does CrewBook cost, and how does the trial work?
Every new company gets 14 days free from the day it's created — no card needed, and the last day is included. After that it's £99/month for the whole company including VAT, unlimited users, cancel anytime. Adding office or site staff never raises the price.
Do my workers need their own logins?
Only people who use the app need one. Crews can simply receive their WhatsApp job briefs on their phones — no login involved. For workers who do log in (to check their day, upload photos, log mileage), invite them as Site Staff and link the login to their record on the Workers page.
A page my colleague has is missing from my menu
Navigation only shows the pages your access tier and page chips grant. An Admin can fix it in Admin → Users & Access — your row → Permissions → turn on the chip. Nothing has been lost; it's just not shown to you.
A job's been rained off — cancel, move or delete?
If it will happen another day, move it (Move day, 📅 Reschedule or drag on the Calendar) — everything booked moves with it. If the day is simply lost, cancel it with a reason — it stays on the record, and can be reinstated. Delete only when the day should never have existed: it removes the job and everything on it.
Whose number do WhatsApp briefs come from?
Your company's own WhatsApp business number, via your own Twilio account — so replies come to you, not to CrewBook. The one-off setup takes about 20 minutes: see integrations.
I've heard about Fleet, Training and Personnel pages — where are they?
They're built but not yet released — they don't appear in anyone's navigation in the current version, whatever their tier. They'll show up as page chips in Users & Access when they launch.
Can I get my data out?
Yes. Wages, holidays, petty cash, costings and invoices all export to spreadsheets; the QCI area exports Sage-ready CSVs; and nightly Google Drive backups (switched on in the setup wizard or Settings) export the whole database — restorable from the Backup page.
Where's the detail on leads, quotes, invoicing and credit control?
The sales area inside CrewBook is QCI — the same product as standalone CrewQCI. The QCI area covers how it joins onto your jobs; the full page-by-page detail lives in the CrewQCI user guide.
Getting help#
The ? button in the app's header brings you back to this guide from any page — straight to that page's chapter. Inside the QCI area it opens the CrewQCI guide, where the sales pages are documented in full.
Stuck on something this guide doesn't cover, or found a snag? Email peter@edwardsapps.co.uk — you'll be talking to the person who builds CrewBook, and the answer usually ends up in this guide for the next person. The exact wording of any error message, and the page you were on, make a fix much quicker.
There's also a condensed Guide page inside the app itself, and the legal pages (Privacy Policy, Terms of Service) live on the Account page behind your round initial button.